Yup, I didn't get it done again. Hanging my head in absolute shame...
BUT the gals did a bang up job on the Steamed Flour Bread that Karen picked out!
So, instead of staring at my never updating home go check out what the Babe's in the sidebar have done with steam, flour and pepper.
You can find out how to join us as a Bread Baking Buddy by visiting Karen's site.
Thursday, September 24, 2009
Sunday, September 13, 2009
Taste of Yellow: Summer Squash Gratin
I spent much of a wet and windy Saturday catching up on my huge backlog of food blogs that accumulated during my month long unplugged break. It was during this catch up session I began to notice a few posts for Barbara of winosandfoodies yearly Taste of Yellow event that supports the Lance Armstrong Foundation's Livestrong fight against cancer.

I've participated in this event before and spoke then about the friends and family I have lost to cancer. This time around I'm going to talk about the friends and family who have survived cancer.
Every single one of them from my best friend who had breast cancer and decided to have preventative surgery in the form of a double mastectomy because her mother, her sister, her grandmother and both aunts had all been diagnosed with breast cancer to my mother in law, who last year less than one month after we both lost Wren, was diagnosed with lung cancer to my biological father, who last year upon returning from a six month trip to China he had been planning for the last ten years to meet his wife's family was diagnosed with thyroid cancer, have one thing in common besides cancer; the way their lives came to a screeching halt.
My best friend was in the midst of writing her thesis for her PhD in Art History. My mother in law was in the middle of grieving for her last living child. My father was reveling in the afterglow of meeting his in-laws who welcomed him into their family with open arms. Regardless of the important events all three of them were engaged in, they all put aside their lives and took up the fight against their cancer.
To honor my friends and family, who thankfully have beat their cancers or whose cancers are in remission, I made a yellow summer squash gratin with the last of the yellow straight neck squash from last week's farmer's market.

Gratins are layered dishes that often include cream, milk, eggs or butter. This gratin is simple and adapted from Alice Water's The Art of Simple Food recipe for summer squash gratin. Her recipe was simple, summer squash, half and half, cream, a bit of butter, salt and pepper.
Like the recipe, I only used half and half and cream with some salt and pepper as the sauce but I added caramelized onions and a dash of nutmeg to the dish. The sauce curdled a bit in the oven but the taste was fantastic, not unlike the lives of people who are diagnosed with cancer. There is a bit of curdling at first but when they come through on the other side, life is even sweeter.

Yellow Summer Squash Gratin
adapted from Alice Water's The Art of Simple Foods
3 medium yellow summer squash, sliced very thin (either long neck or crooked neck yellow squash)
Kosher salt, for sprinkling on summer squash
3 Tbsp salted butter
1 large Vidalia onion, sliced
2 cloves garlic, minced
2 Tbsp nutmeg
pepper
1/2 cup of finely shredded swiss cheese (optional)
1/2 cup half and half
1/2 cup heavy cream
Slice squash very thin, spread on cookie sheet, and lightly sprinkle with Kosher salt. Set aside while caramelizing the onions.
In large saute pan, melt butter over medium low heat add onions and stir with wooden spoon to coat completely with melted butter. Let onions sweat and slowly caramelize. This will take about 15 - 20 minutes. When onions are just starting to turn golden brown at the edges, add garlic and nutmeg. Stir for about 1 minute until you just start to smell garlic. Remove from heat and set aside.
In greased 8 x 4 loaf pan, put one layer of squash on the bottom, sprinkle 1/4 of the onions on top of the squash, and lightly sprinkle with pepper and swiss cheese, if using. Repeat until all the squash is used, finishing with onions and cheese on top.
In measuring cup, whisk together half and half and cream and pour over squash and onion layers.
Bake in pre-heated 350 degree oven for about 1 hour or until top is brown and bubbling and squash is tender.
Allow to stand for 10 minutes until gratin sets up before serving.

I've participated in this event before and spoke then about the friends and family I have lost to cancer. This time around I'm going to talk about the friends and family who have survived cancer.
Every single one of them from my best friend who had breast cancer and decided to have preventative surgery in the form of a double mastectomy because her mother, her sister, her grandmother and both aunts had all been diagnosed with breast cancer to my mother in law, who last year less than one month after we both lost Wren, was diagnosed with lung cancer to my biological father, who last year upon returning from a six month trip to China he had been planning for the last ten years to meet his wife's family was diagnosed with thyroid cancer, have one thing in common besides cancer; the way their lives came to a screeching halt.
My best friend was in the midst of writing her thesis for her PhD in Art History. My mother in law was in the middle of grieving for her last living child. My father was reveling in the afterglow of meeting his in-laws who welcomed him into their family with open arms. Regardless of the important events all three of them were engaged in, they all put aside their lives and took up the fight against their cancer.
To honor my friends and family, who thankfully have beat their cancers or whose cancers are in remission, I made a yellow summer squash gratin with the last of the yellow straight neck squash from last week's farmer's market.

Gratins are layered dishes that often include cream, milk, eggs or butter. This gratin is simple and adapted from Alice Water's The Art of Simple Food
Like the recipe, I only used half and half and cream with some salt and pepper as the sauce but I added caramelized onions and a dash of nutmeg to the dish. The sauce curdled a bit in the oven but the taste was fantastic, not unlike the lives of people who are diagnosed with cancer. There is a bit of curdling at first but when they come through on the other side, life is even sweeter.

Yellow Summer Squash Gratin
adapted from Alice Water's The Art of Simple Foods
3 medium yellow summer squash, sliced very thin (either long neck or crooked neck yellow squash)
Kosher salt, for sprinkling on summer squash
3 Tbsp salted butter
1 large Vidalia onion, sliced
2 cloves garlic, minced
2 Tbsp nutmeg
pepper
1/2 cup of finely shredded swiss cheese (optional)
1/2 cup half and half
1/2 cup heavy cream
Slice squash very thin, spread on cookie sheet, and lightly sprinkle with Kosher salt. Set aside while caramelizing the onions.
In large saute pan, melt butter over medium low heat add onions and stir with wooden spoon to coat completely with melted butter. Let onions sweat and slowly caramelize. This will take about 15 - 20 minutes. When onions are just starting to turn golden brown at the edges, add garlic and nutmeg. Stir for about 1 minute until you just start to smell garlic. Remove from heat and set aside.
In greased 8 x 4 loaf pan, put one layer of squash on the bottom, sprinkle 1/4 of the onions on top of the squash, and lightly sprinkle with pepper and swiss cheese, if using. Repeat until all the squash is used, finishing with onions and cheese on top.
In measuring cup, whisk together half and half and cream and pour over squash and onion layers.
Bake in pre-heated 350 degree oven for about 1 hour or until top is brown and bubbling and squash is tender.
Allow to stand for 10 minutes until gratin sets up before serving.
Saturday, September 12, 2009
Nearly Wordless Weekend Cat Blogging
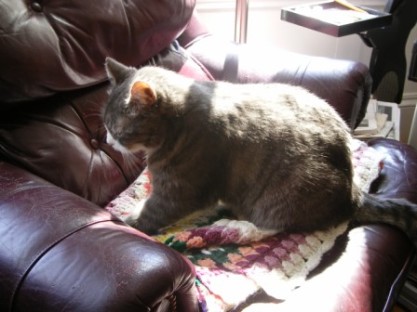
(kneading, kneading,kneading)
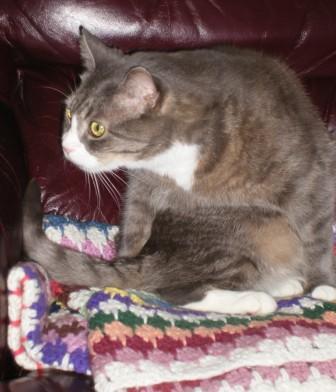
Umm...You want me to protect you from that big dangerous cord thingy?

OK!!
We're hosting Weekend Cat Blogging but not saying much this weekend. Leave a comment if you want to participate and check back on Sunday to see what the other cats are saying or not saying!
Thursday, September 10, 2009
Arnold Palmer Cookies for "The King"
Today, probably the greatest golfer who ever strode to a tee box, Arnold Palmer aka "The King", turns 80.

(Photo courtesy of russhons)
Whenever I think of Arnold Palmer, I think of lazy Sundays sitting on the floor in front of my dad's chair while we watched Arnold go head to head with his arch nemesis, Jack Nicklaus. We would sit, watch golf, and catch up with each other. He would ask me about school, I would ask about his job and we would both groan when ever Arnie or Jack missed a putt, put the ball in the rough, or hit a ball into a hazard. I think those Sundays spent watching Arnie, Jack and just spending time with my dad are when I first came to love golf.
Even if you don't play golf, have never watched golf, and couldn't name any players on the PGA Tour today other than Tiger Woods, you probably have heard of Arnold Palmer; if for nothing else for the drink of half iced tea and half lemonade named after him.

Several versions of how this refreshing drink became to be known as the "Arnold Palmer" exist. The most often cited tale is in the 1960s he ordered this combination of iced tea and lemonade in a bar and a woman sitting at the table next to him told the waitress to bring her "that Palmer drink". Regardless of how the drink got its name, it is one of my favorite non-alcoholic drinks and even though it is associated with summer, I drink it all year round. It is light and refreshing even when there is ten inches of snow on the ground.
I wanted to take that refreshing feeling I get when I drink an Arnold Palmer and put it in a cookie.
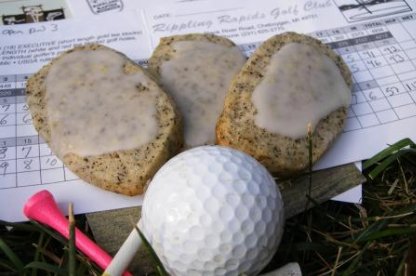
So, I pulled out my trusty, killer recipe for lemon shortbread, my new kitchen gadget, a motar and pestle, and my tin of loose Twinings English Breakfast tea.

After finely grinding the tea,
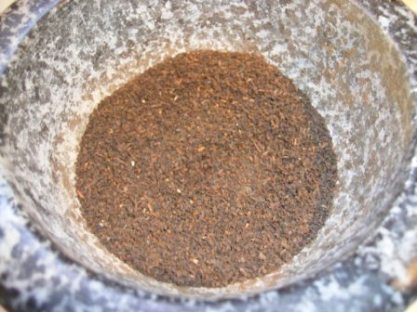
I made the dough,

and formed a dough plank about 15" long by 3" wide by 2" tall
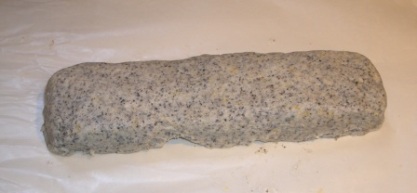
before placing the dough in the freezer for about 30 minutes.
While the dough was in the freezer I made the glaze using both fresh squeezed lemonade and brewed iced tea.
After removing the almost frozen dough from the freezer, I sliced it to about 1/4" thick and placed the slices on a parchment paper lined jelly roll pan.

I baked the cookies in a pre-heated 350 degree oven for 12 minutes until the cookies were slightly brown at the edges. After letting the cookies cool on the pan for a few minutes, I removed them to a cooling rack to finish cooling completely before I glazed them with a simple glaze made from confectioners sugar, lemonade and fresh brewed iced tea.
These cookies were every bit as refreshing as the drink that inspired them. According to my taste testers, they were a hole in one.
Happy 80th Birthday Arnie! You really are "The King".
Arnold Palmer Cookies

Dough:
1 1/2 C unsalted butter, softened
1/4 C sifted confectioners sugar
1/4C sugar
1 1/2 Tbsp lemon zest
1/8 C lemonade, (Homemade is best but if you have to use store bought, try to get some that doesn't use high fructose corn syrup)
1/4 tsp salt
1 3/4 C AP flour, sifted
1/8 C finely ground black tea
Combine flour, salt and tea and set aside. Cream butter and sugars until the butter is light and fluffy. Add into the butter mixture, the lemon zest and lemonade. 1/4 cup at a time, add in flour mixture until the dough just comes together.
Form the dough plank on waxed paper, place in the freezer for 20 minutes. Dough can also be wrapped and frozen for up to 1 month.
Slice frozen dough in 1/4" slices, place on prepared or parchment paper lined cookie pan. Bake for 12 minutes or until edges are just starting to turn golden brown in pre-heated 350 degree oven.
Remove from oven, allow to cool on pan for 1-2 minutes before transferring the cookies to a cooling rack. Allow to cool completely before glazing.
Glaze:
1 cup confectioners sugar, sifted
1 Tbsp lemonade
1 Tbsp freshly brewed tea
Combine the ingredients together. You may need to add more liquid or sugar to get the glaze to the consistency you desire.
Make 2 dozen. These cookies freeze well, ship fantastic, and will stay fresh for one week in a sealed container.

(Photo courtesy of russhons)
Whenever I think of Arnold Palmer, I think of lazy Sundays sitting on the floor in front of my dad's chair while we watched Arnold go head to head with his arch nemesis, Jack Nicklaus. We would sit, watch golf, and catch up with each other. He would ask me about school, I would ask about his job and we would both groan when ever Arnie or Jack missed a putt, put the ball in the rough, or hit a ball into a hazard. I think those Sundays spent watching Arnie, Jack and just spending time with my dad are when I first came to love golf.
Even if you don't play golf, have never watched golf, and couldn't name any players on the PGA Tour today other than Tiger Woods, you probably have heard of Arnold Palmer; if for nothing else for the drink of half iced tea and half lemonade named after him.

Several versions of how this refreshing drink became to be known as the "Arnold Palmer" exist. The most often cited tale is in the 1960s he ordered this combination of iced tea and lemonade in a bar and a woman sitting at the table next to him told the waitress to bring her "that Palmer drink". Regardless of how the drink got its name, it is one of my favorite non-alcoholic drinks and even though it is associated with summer, I drink it all year round. It is light and refreshing even when there is ten inches of snow on the ground.
I wanted to take that refreshing feeling I get when I drink an Arnold Palmer and put it in a cookie.

So, I pulled out my trusty, killer recipe for lemon shortbread, my new kitchen gadget, a motar and pestle, and my tin of loose Twinings English Breakfast tea.

After finely grinding the tea,

I made the dough,

and formed a dough plank about 15" long by 3" wide by 2" tall

before placing the dough in the freezer for about 30 minutes.
While the dough was in the freezer I made the glaze using both fresh squeezed lemonade and brewed iced tea.
After removing the almost frozen dough from the freezer, I sliced it to about 1/4" thick and placed the slices on a parchment paper lined jelly roll pan.

I baked the cookies in a pre-heated 350 degree oven for 12 minutes until the cookies were slightly brown at the edges. After letting the cookies cool on the pan for a few minutes, I removed them to a cooling rack to finish cooling completely before I glazed them with a simple glaze made from confectioners sugar, lemonade and fresh brewed iced tea.
These cookies were every bit as refreshing as the drink that inspired them. According to my taste testers, they were a hole in one.
Happy 80th Birthday Arnie! You really are "The King".
Arnold Palmer Cookies

Dough:
1 1/2 C unsalted butter, softened
1/4 C sifted confectioners sugar
1/4C sugar
1 1/2 Tbsp lemon zest
1/8 C lemonade, (Homemade is best but if you have to use store bought, try to get some that doesn't use high fructose corn syrup)
1/4 tsp salt
1 3/4 C AP flour, sifted
1/8 C finely ground black tea
Combine flour, salt and tea and set aside. Cream butter and sugars until the butter is light and fluffy. Add into the butter mixture, the lemon zest and lemonade. 1/4 cup at a time, add in flour mixture until the dough just comes together.
Form the dough plank on waxed paper, place in the freezer for 20 minutes. Dough can also be wrapped and frozen for up to 1 month.
Slice frozen dough in 1/4" slices, place on prepared or parchment paper lined cookie pan. Bake for 12 minutes or until edges are just starting to turn golden brown in pre-heated 350 degree oven.
Remove from oven, allow to cool on pan for 1-2 minutes before transferring the cookies to a cooling rack. Allow to cool completely before glazing.
Glaze:
1 cup confectioners sugar, sifted
1 Tbsp lemonade
1 Tbsp freshly brewed tea
Combine the ingredients together. You may need to add more liquid or sugar to get the glaze to the consistency you desire.
Make 2 dozen. These cookies freeze well, ship fantastic, and will stay fresh for one week in a sealed container.
Sunday, September 06, 2009
Edible Word: Confections of a Closet Master Baker
If you are a long time reader of The Sour Dough (if there are any of you left after my almost month long absence from this little spot on the web), you know that besides baking and now golf, reading is my other deep abiding passion.
I typically have three or four different books going at any given time. A quick survey this morning of my bedside table revealed the following titles: John Feinstein's Tales from Q School: Inside Golf's Fifth Major , Julie Nicolson's The Perfect Summer: England 1911, Just Before the Storm
 , Mary Lovell's The Sisters: The Saga of the Mitford Family
 , Artisan Bread in Five Minutes a Day
 , and this round of The Edible Word's book, Gesine Bullock-Prado's Confections of a Closet Master Baker
 .
.
![Confections_of_a_Closet_Master_Baker_-_Hi_Rez_Cover[2]](http://farm3.static.flickr.com/2226/3893262038_7b37f80986_o.jpg)
When The Edible Word's hostesses Cath of A Blithe Palate and Stephanie of Dispensing Happiness asked me if I wanted to participate in this round I didn't hesitate to say yes. After all, I was going to get a chance to read a book about someone who is living a fantasy of mine, chucking their current life in for a chance at the nagging dream of owning their own bakery and making good on that dream.
One of the over riding themes in "Confections of a Closet Master Baker" is making the treats from family recipes, especially the author's mother and grandmother, for friends and family. As I read through the book and the wonderful recipes, I began to think about my family recipes. I have the recipe boxes of both my maternal and paternal grandmothers as well as copies of recipes my mother and mother in law have made for me of their recipes. But, rarely have I made these well loved recipes for anyone other than family. Reading in "Confections of a Closet Master Baker" how people reacted with extra joy when receiving a loved family treat made me want to break out my family recipes and share them with friends, co-workers and you, my readers.
Chocolate looms large in the recipes in Ms. Bullock Prado's life. She even stole a whole bag of Oreo cookies from a neighbor's pantry once to satisfy her craving for chocolate sweets. Chocolate has always been a mainstay in my family treat baking but no one cookie, brownie, or cake defines my family's love of chocolate more than my paternal Grandmother Myrna's Magic Chocolate Cookies.
My father is the oldest of thirteen kids. When all the siblings and their families would gather once a year at his parent's lake house on the shores of Burt Lake, my grandmother would bake for a week getting ready for the onslaught of over twenty grandkids. With that many kids, there was sure to be disagreements over chewy versus crisp cookies and my grandmother's Magic Chocolate Cookies could satisfy both in one cookie.
These cookies are chewy and gooey during the first day but become light and crisp after the first day and a quick three minute trip to a warm oven will return them to chewy status. Either way, crisp or chewy, their is enough chocolate goodness in these to satsify any kid of any age's craving for chocolate.
The ingredients for Magic Chocolate are simple, butter, sugar, eggs, vanilla, flour, baking soda, salt, and cocoa powder (either natural or dutch processed work fine).
I always sift together the flour, baking soda, salt and cocoa powder and set it aside before beginning the recipe. This makes the last step of the dough easier to mix.
Then I cream the sugar and butter using my stand mixer (you can do it by hand too). The recipe calls for a scant 1/4 cup of softened butter to two cups of sugar. When you start creaming, don't worry if you don't think you will have enough butter. You really want buttery sugar and will have the butter and sugar creamed enough when it looks like this:

Next, whisk two eggs with vanilla and combine it with the butter sugar mixture.

Then I add the flour mixture, one 1/2 cup measure at a time. The dough will be stiff at first after you've added the last one or two 1/2 cup measures.

Don't worry though because after about two or three minutes of mixing at medium speed your dough will become soft and deep, dark chocolate brown.
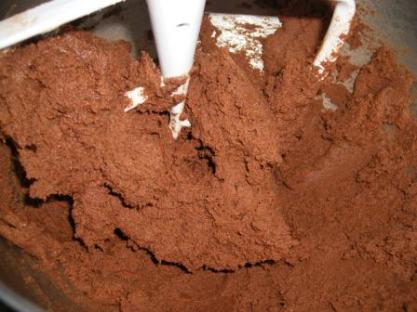
I let the dough rest a few minutes while I gather and prep the cookie sheets and pre-heat the oven to 350 degrees. I also like to get a bowl of sparkling sugar to roll the dough balls into before placing them on either greased cookie sheets or parchment paper.

Using a teaspoon, I scoop a little dough out of the bowl and roll it into a 1/2" diameter ball, roll the dough ball into the sparkle sugar, and place about 2" apart on the cookie sheet.
I bake the cookies for about 7 - 9 minutes, until the cookies just spread and a few cracks appear on the cookies. After removing them from the oven, I let them sit for two or three minutes until they just set up before placing them on the cooling racks to cool.

They will be chewy and dark satisfyingly chocolate for the first day or so. If you want crisper cookies right out of the oven, let them bake for 8 - 10 minutes but keep your eye on them as they will go from crisp to toothbreaking hard quickly if you do this.
Personally, I love them as cookies the first day and then use them to dip into my espresso the next day.
Who knows, if I ever decide to do what Ms. Bullock-Prado did when she left her high flying life in Hollywood and open a bakery in some small town in Northern Michigan, these Magic Chocolate Cookies may just be the signature afternoon treat of my little shop.
Grandma Myrna's Magic Chocolate Cookies
1/4 C butter, softened
2 C sugar
2 eggs, large
2 tsp vanilla
2 C AP flour
3/4 C cocoa powder, either natural or dutch processed
1 tsp baking soda
1/2 tsp salt
1 C sparkle sugar to roll dough balls into (Optional)
Sift together flour, cocoa powder, baking soda, and salt and set aside. Cream butter and sugar until the sugar is completely coated. Whisk together two eggs and vanilla and combine into the sugar mixture. Add floor mixture one 1/2 cup at a time. Dough will be stiff at first but mix for 2-3 minutes until combined completely.
Let dough rest for a few minutes. Using a spoon, scoop out enough dough to make 1/2" diameter dough ball. If using the sparkle sugar, roll dough ball into sugar and place on greased or parchment paper prepared cookie sheets 2" apart.
Bake for 7 - 9 minutes in a 350 degree pre-heated oven. Let cookies rest on pan until set up when removing from the oven before placing on cooling racks.
Enjoy warm or cool. Cookies will be chewy for the first day and then become crisp and light after. To make them chewy again, place three minutes in a 350 degree oven.
Makes 3 dozen cookies. Will stay fresh for three or four days or can be frozen.
I typically have three or four different books going at any given time. A quick survey this morning of my bedside table revealed the following titles: John Feinstein's Tales from Q School: Inside Golf's Fifth Major
![Confections_of_a_Closet_Master_Baker_-_Hi_Rez_Cover[2]](http://farm3.static.flickr.com/2226/3893262038_7b37f80986_o.jpg)
When The Edible Word's hostesses Cath of A Blithe Palate and Stephanie of Dispensing Happiness asked me if I wanted to participate in this round I didn't hesitate to say yes. After all, I was going to get a chance to read a book about someone who is living a fantasy of mine, chucking their current life in for a chance at the nagging dream of owning their own bakery and making good on that dream.
One of the over riding themes in "Confections of a Closet Master Baker" is making the treats from family recipes, especially the author's mother and grandmother, for friends and family. As I read through the book and the wonderful recipes, I began to think about my family recipes. I have the recipe boxes of both my maternal and paternal grandmothers as well as copies of recipes my mother and mother in law have made for me of their recipes. But, rarely have I made these well loved recipes for anyone other than family. Reading in "Confections of a Closet Master Baker" how people reacted with extra joy when receiving a loved family treat made me want to break out my family recipes and share them with friends, co-workers and you, my readers.
Chocolate looms large in the recipes in Ms. Bullock Prado's life. She even stole a whole bag of Oreo cookies from a neighbor's pantry once to satisfy her craving for chocolate sweets. Chocolate has always been a mainstay in my family treat baking but no one cookie, brownie, or cake defines my family's love of chocolate more than my paternal Grandmother Myrna's Magic Chocolate Cookies.
My father is the oldest of thirteen kids. When all the siblings and their families would gather once a year at his parent's lake house on the shores of Burt Lake, my grandmother would bake for a week getting ready for the onslaught of over twenty grandkids. With that many kids, there was sure to be disagreements over chewy versus crisp cookies and my grandmother's Magic Chocolate Cookies could satisfy both in one cookie.
These cookies are chewy and gooey during the first day but become light and crisp after the first day and a quick three minute trip to a warm oven will return them to chewy status. Either way, crisp or chewy, their is enough chocolate goodness in these to satsify any kid of any age's craving for chocolate.
The ingredients for Magic Chocolate are simple, butter, sugar, eggs, vanilla, flour, baking soda, salt, and cocoa powder (either natural or dutch processed work fine).
I always sift together the flour, baking soda, salt and cocoa powder and set it aside before beginning the recipe. This makes the last step of the dough easier to mix.
Then I cream the sugar and butter using my stand mixer (you can do it by hand too). The recipe calls for a scant 1/4 cup of softened butter to two cups of sugar. When you start creaming, don't worry if you don't think you will have enough butter. You really want buttery sugar and will have the butter and sugar creamed enough when it looks like this:

Next, whisk two eggs with vanilla and combine it with the butter sugar mixture.

Then I add the flour mixture, one 1/2 cup measure at a time. The dough will be stiff at first after you've added the last one or two 1/2 cup measures.

Don't worry though because after about two or three minutes of mixing at medium speed your dough will become soft and deep, dark chocolate brown.

I let the dough rest a few minutes while I gather and prep the cookie sheets and pre-heat the oven to 350 degrees. I also like to get a bowl of sparkling sugar to roll the dough balls into before placing them on either greased cookie sheets or parchment paper.

Using a teaspoon, I scoop a little dough out of the bowl and roll it into a 1/2" diameter ball, roll the dough ball into the sparkle sugar, and place about 2" apart on the cookie sheet.
I bake the cookies for about 7 - 9 minutes, until the cookies just spread and a few cracks appear on the cookies. After removing them from the oven, I let them sit for two or three minutes until they just set up before placing them on the cooling racks to cool.

They will be chewy and dark satisfyingly chocolate for the first day or so. If you want crisper cookies right out of the oven, let them bake for 8 - 10 minutes but keep your eye on them as they will go from crisp to toothbreaking hard quickly if you do this.
Personally, I love them as cookies the first day and then use them to dip into my espresso the next day.
Who knows, if I ever decide to do what Ms. Bullock-Prado did when she left her high flying life in Hollywood and open a bakery in some small town in Northern Michigan, these Magic Chocolate Cookies may just be the signature afternoon treat of my little shop.
Grandma Myrna's Magic Chocolate Cookies
1/4 C butter, softened
2 C sugar
2 eggs, large
2 tsp vanilla
2 C AP flour
3/4 C cocoa powder, either natural or dutch processed
1 tsp baking soda
1/2 tsp salt
1 C sparkle sugar to roll dough balls into (Optional)
Sift together flour, cocoa powder, baking soda, and salt and set aside. Cream butter and sugar until the sugar is completely coated. Whisk together two eggs and vanilla and combine into the sugar mixture. Add floor mixture one 1/2 cup at a time. Dough will be stiff at first but mix for 2-3 minutes until combined completely.
Let dough rest for a few minutes. Using a spoon, scoop out enough dough to make 1/2" diameter dough ball. If using the sparkle sugar, roll dough ball into sugar and place on greased or parchment paper prepared cookie sheets 2" apart.
Bake for 7 - 9 minutes in a 350 degree pre-heated oven. Let cookies rest on pan until set up when removing from the oven before placing on cooling racks.
Enjoy warm or cool. Cookies will be chewy for the first day and then become crisp and light after. To make them chewy again, place three minutes in a 350 degree oven.
Makes 3 dozen cookies. Will stay fresh for three or four days or can be frozen.
