
Sunday, February 25, 2007

The Great Asiago Cheese Bread Challenge

About two weeks ago, Lis over at La Mia Cucina and I were exchanging emails back and forth with a furious pace about important topics like fruit in sourdough starters, growing up along the Great Lakes, and 80's Hair Bands. Lis was sick with that awful head/throat/upper chest cold so many of us in this merry little band of food bloggers have been fighting on and off all winter. So naturally, our missives turned to foods we crave when we are sick. Mine included, of all things, McDonald's Big Macs and their vanilla shakes (Who would have thought that Wikipedia would have an entry for Big Mac??!!). Lis had only two foods she wanted, sweet potatoes and Panera's Asiago Cheese Bread toasted. She waxed very poetically about the crumb and the crunchy, cheesy top of the bread and how the zing of the cheese was perfectly matched with the sweet of the dough. A little digging on her part on the Panera website produced a complicated recipe for the bread based around a grape sourdough starter with overnight ferments and fussy steps. The recipe, while completely authentic and correct, was lots of work with lots of time involved; especially for someone not feeling well and just wanting their feel good bread. So, I offered to see if I could find a quick, easy, down and dirty way to short-cut the Panera recipe for a novice bread baker.

Studying the Panera recipe, I made a few assumptions about how to make the bread without having to go through creating a starter and long, overnight ferments but I would need to do some actual taste testing on the Panera bread to be 100% sure I was on the right track (darn). So off to my local Panera I went to purchase a few "control" specimens: two asiago cheese bagels and one asiago cheese loaf. Consuming one of the bagels on my drive home confirmed some of my hypothesis: the bread was very soft and chewy with a sweet tang undertone and that a sponge method probably would produce similar results in chewiness and texture. With a few ideas of how to shorten the time, all that was left was to figure out the exact proportions and ingredients.

Knowing that potato bread is a favourite for sandwiches because of its soft and chewy texture and has a golden colour, I decided to use as my base the potato bread recipe from Rose Levy Beranbaum's The Bread Bible. Other recipes I took some inspiration from are Rose Levy Beranbaum's cheese bread from The Bread Bible and the cheese bread recipe from The King Arthur Flour Baker's Companion: The All-Purpose Baking Cookbook. It took two attempts at making this bread before I was satisfied I had a recipe that was fairly easy to duplicate and had the same taste and texture as the Panera asiago cheese bread.

The first attempt was basically the potato bread recipe from The Bread Bible verbatim but with 1 1/2 cups of grated asiago cheese and 1/4 cup less liquid (to account for the moisture the cheese would add). It was tasty and soft with the right look but didn't have the chewy texture of the Panera bread nor enough of the tang. For the second loaf, I decided to make some adjustments to the ingredients and proportions as well as the sponge ferment time. The first adjustment I made was to increase the amount of potato starch in the recipe. Potato starch adds chewiness to bread which is why you will see ingredients like instant potato flakes and potato water in Canadian white bread recipes (not breads from Canada that are white but a "type" of heartier white bread popular in the US that is denser than traditional white bread). Not wanting to add more liquid to the recipe, I decided to stir into the potato water 3 tablespoon of mashed potatoes and then strain the water to get out any undissolved bits of potato. I also decided to add bread flour for more gluten (more gluten = bigger chew) and dry milk (softer crumb). Letting the sponge ferment longer than called for in the potato bread recipe would mean the yeast had more time to develop tang from the release of gasses. I also added 2 Tbsp of plain yogurt to get instant zing; a trick from a fellow sourdough baker who likes really zippy sour in his bread. The results this time were an almost perfect copy of the Panera Asiago Cheese Bread; chewy and dense with a super soft crumb and more tang.

Basically making this bread has six steps: Sponge, Make Dough, First Rise, Shape Loaf, Second Rise, Bake. Each one of these stages has a few mini-steps. Also, while this is shorter than the Panera Bread recipe which takes 12 -16 hours plus, making this bread takes about 7 total hours.So, here we go!

Breadchick's Copycat Asiago Cheese Bread
inspired by Panera Bread and Lisa of La Mia Cucina. With special thanks to Rose Levy Beranbaum and as always King Arthur Flour (Sounds like an Oscar acceptance speech doesn't it??)

Sponge
1 medium high starch potato (I used Yukon Gold)
1 cup plus 3 Tbsp unbleached all purpose flour
3/4 cup potato water
3 Tbsp mashed potatoes
1 Tbsp honey
1/2 tsp instant/rapid rise yeast

Step 1: In a large glass bowl or 2 1/2 quart plastic container with lid, combine flour and yeast and set aside.

Step 2: Peel potato and dice into small cubes, place in medium sized sauce pan. Add to 2 cups cold water and bring to boil. Let boil for 20 minutes. Don't worry if the cubes break down, we're going to mash the potatoes and we want lots of starch in the water. Strain the potatoes, reserving the water. Mash the cubes into a very fine mash using a food mill or potato ricer (or lots of elbow grease). Let potato water cool to 110 degrees and stir in 3 Tbsp of mashed potatoes until potatoes are dissolved. Using a very fine strainer over a liquid measuring cup (coffee filter in a strainer works if you don't have a fine mesh strainer), measure out 3/4 cup of potato water. Set aside remaining potato water, you may need to add more liquid during the dough stage.

Step 3: Add potato water and honey to flour mixture and mix thoroughly so there are no lumps of flour. Cover your glass bowl tightly with plastic wrap or if you are using a plastic bowl/lid combination, make sure the lid is on tightly. Place in a warm place (70 - 90 degrees. I like to use my oven with the oven light on for my warm place). Let ferment for 2 hours or until tripled. The sponge will be extremely bubbly and look like a billowing cloud.


Dough/First Rise
1/2 cup plus 2 Tbsp unbleached all purpose flour
1/2 cup plus 2 Tbsp bread flour (12% gluten or more)
1 Tbsp dry non-fat milk
1 Tbsp instant mashed potato flakes
3/8 tsp instant yeast
3/4 tsp salt
2 Tbsp plain (not vanilla) yogurt
1 1/2 cups of grated Asiago cheese (reserve 1/4 cup for top of bread)
1/4 cup grated Parmesan cheese

Step 1:Combine flours, dry milk, potato flakes, yeast and salt into a medium bowl and add the fermented sponge (Since I use a 2 1/2 quart plastic bowl/lid combo for my sponge container, I use my sponge bowl as my mixing bowl/proofing box so I add the dry ingredients directly into my sponge). Stir until almost all combined. This will look dry. Do not add any liquid though.

Step 2: Stir in yogurt and cheeses. Dough will be sticky but shouldn't be runny. If runny, add more all purpose flour, 1 Tbsp at a time until dough is sticky but not oozy. If still dry, add more potato water, 1/2 Tbsp at a time.

Step 3: Turn dough out onto a well floured surface and knead for 5 minutes. Dough will feel lumpy due to cheese but will have some "spring" when done kneading. Let dough rest for 10 minutes to relax the gluten. Pull the dough into a ball. The dough should feel moist but not sticky. If still sticky, knead a bit more flour into the dough, 1 Tbsp at a time. If you add flour, let dough rest for 10 minutes and test for moist firmness again.

Step 4: While dough is resting, clean out sponge container and smear unsalted butter all over the container and lid (if using container with lid). Gather rested dough into round ball and place back into prepared sponge container. If using glass bowl, smear some butter on top of dough ball to prevent dough from sticking to plastic wrap at end of rise


Reseal sponge container or tightly cover glass bowl with plastic wrap and return dough to warm place to rise for 1 1/2 hours or until double.


Shape the Loaf/Second Rise:
Step 1: Remove risen dough from warm place and very gently deflate by placing fist in middle of risen dough and pushing down. Do not "punch" dough, we want some air to remain in the dough. This is what creates "holes" in the finished bread.

Step 2: Turn dough out onto very lightly floured surface. Dough will be very springy and bouncy to the touch. Gently press and stretch dough into a rectangle about 6 1/2" wide by 12" long. If dough keeps springing back, stretch dough a little, let it rest about 5 minutes, stretch dough a bit more, let rest and repeat until dough is about right size. (This is the gluten in the dough acting like a rubber band. Gluten is what gives bread its chew).

Step 3: With the dough rectangle oriented like this:


Starting at the top, fold 1/3 of the dough down towards you like a 3 fold business letter.


Fold bottom third of dough up and away from you to cover the first fold.


Place in buttered 8 1/2" by 4 1/2" glass loaf pan, seam side down. Brush melted butter on top of dough, cover loaf pan tightly with plastic wrap and return to warm place. Let rise for 1 hour or until dough begins to touch plastic wrap. Remove the plastic wrap and let dough continue to rise until about 1/2" above edge of loaf pan.


Baking the Loaf:

Step 1: If you are using your oven for your warm place, remove the risen loaf from the oven. Pre-heat the oven at 350 degrees.

Step 2: Gently brush top of risen loaf with and egg white wash (1 egg white and 1/2 tsp water combined). Sprinkle reserved grated asiago cheese on top of risen loaf


Step 3: Bake bread for 40 minutes or until golden brown. An instant thermometer inserted into the center of the bread will read 210 degrees when bread is done.

Step 4: Warning!! This is the hardest part of this recipe. Let bread cool COMPLETELY on a wire rack. If you cut into this bread while it is even slightly warm, it will get all gooey and soggy. If you want it warm when you eat it, heat it for 10 - 15 seconds in the microwave or toast it!

So you can see how my copycat loaf compared in looks to the Panera loaf, here are some pictures. The Panera "control" loaf is sitting on top of my bread.
Crumb and texture:


Crust and Colour:

Wednesday, February 21, 2007

One Last Paczki Post

While I work out a few "issues" with posting pictures from remote locations so I can finish up two requested posts (Yes, Lisa THAT post) you can feast your eyes on more Paczkis, including a big, huge live one...

Paczki Power in Northern Michigan

Neil Rubin sings to the love of a "jelly filled donut"

Tuesday, February 20, 2007

How Did it Get to Be Fat Tuesday?

Ok, so how did I miss that today was Fat Tuesday?

I had great plans this year to make a King Cake and bring it into work.

And I forgot to tell my mom to go to Rogers City over the weekend to get me a Paczki.

Sigh....

Oh well. Happy Paczki Day (that's Fat Tuesday to most of you!)

Paczki
Note: I'm republishing this recipe from last year's Paczki Day Post
1 1/2 packages active dry yeast
10 egg yolks
1/3 cup sugar
3/4 ounce rum or whiskey
1/4 cup lukewarm milk
1/2 cup melted butter
3 1/4 cups all purpose flour
1 1/2 cups canned prune filling or cherry jam
(Note: you can substitute any flavoured jam to your liking, just be careful to avoid the really sweet ones as they will be overpowering. Some recipes I’ve found also use poppy seed paste)
1/2 cup milk, scalded & cooled
1 teaspoon salt
powdered sugar

Step 1: Make the sponge

Activate the yeast by dissolving in the 1/4 cup lukewarm milk( milk will become slightly bubbly and frothy in about 5-10 minutes). Scald the 1/2 cup milk while waiting for the yeast to become activated and gradually add the flour into the scalded milk (I sift my flour before adding it to the scalded milk). Add the yeast mixture and stir until smooth. Cover and let rise until very bubbly (about 1/2 hour)

Step 2: Make the dough

Beat the salt into the egg yolks. Then add the sponge to the egg yolks and salt. Mix very well until smooth. Add the sugar and rum again mixing well. Knead in the bowl until a nice smooth dough ball forms. Next, form a well and pour in the melted butter and combine with your hands until thoroughly mixed. Place in a greased bowl, coat with nonstick cooking spray, cover with plastic wrap and let rise until doubled (about 1 - 1 1/2 hours). When dough is doubled, punch it down and let rise until double or triple (about 2 hours).

Step 3: Form the paczki:

Divide dough in half, set one half aside in covered bowl so it doesn’t dry out. Roll out the half you are working into a rectangle that is about 1/4 inch thick. Using a biscuit cutter or the mouth of a glass (2″ or larger) cut as many rounds as possible. Place a about 3 tsp of filling in the center of one round. Brush edge of round with egg white and cover the filling with another round. Seal edges very well so filling won’t leak out and rounds won’t separate during last rise. Place the filled paczki greased baking sheets. Leave about 4 inches of room between each paczki to allow for rising. Repeat the process until all the dough is used (this recipe will make between 10 - 12 good sized paczki depending on amount of dough). Lightly cover with greased plastic wrap and let the paczki rise until doubled (about 1 hour).

Step 4: Fry the paczki
(note: if you have a deep fryer, make sure you change the oil if you have fried anything other than pastries)

Pour a neutral tasting oil into a deep fryer or deep pan (about 7 inches if you are using deep pan ). Heat the oil until it is about 360 to 370 degrees. Deep fry the paczki for about 3 minutes per side or until golden brown on both sides and it floats to the top. Let drain on cooling rack covered with paper towel to absorb any excess oil (flip over after about 2 minutes or so) Dust with powdered sugar when slightly warm. Let cool completely before serving as filling will be very hot otherwise.


Wednesday, February 14, 2007

My, What Beautiful Buns You Have!

The weather was absolutely frightful in Boston today. It couldn't make up its mind whether it wanted to snow, blow, rain, sleet, or ice...so of course it did all those things and sometimes all at once. I was out in our driveway three times today pushing the wettest, heaviest snow I think I've ever had to shovel. All this meant that I didn't go into work but rather "worked" from home.

And exactly what did I work on? I worked on my buns...


Beautiful Burger Buns
Adapted from King Arthur Flour Baker's Companion
Makes 8 Large Buns

8 oz water
2 Tbsp melted unsalted butter
1 large egg
1 tablespoon instant yeast
2 3/4 cup unbleached all purpose flour
1/2 cup bread flour
1/4 cup potato flakes
1/4 cup sugar
1 tsp salt
1/2 tsp onion powder (optional)
sesame seeds, poppy seeds, or minced dried onion (optional)
1 egg white and 1 tsp water for egg wash

Sponge: Combine water, 1/2 Tbsp yeast, and 1 1/2 cup all purpose flour and 1/4 cup bread flour into a glass bowl. Cover with plastic wrap and let ferment in a warm place for 1 1/2 hour or until tripled.

Dough: Add melted butter, sugar, egg, remainder of yeast, salt/onion powder (if using), and potato flakes to sponge. Mix thoroughly. Add remaining bread flour and 2 1/2 cups of flour. On well floured surface, knead in remaining flour. This dough will be very soft and sticky. Knead, adding additional flour 1 Tbsp at a time if necessary until dough is firm and smooth but still soft (about 5 minutes). Let rest for 10 minutes. Knead 3-5 additional minutes adding flour again 1 Tbsp at a time if dough is still too sticky. Place in buttered glass bowl and let rise for 1 hour or until doubled.

Forming and Baking Rolls: Gently "punch" down dough and on lightly floured surface, divide dough into 8 pieces. Shape each piece of dough into a ball about 4" in diameter, making sure not to compress too much. Brush the top of each ball with egg wash then roll top into seeds or onions. Place on greased baking sheet about 4" apart and cover with plastic wrap (spray plastic wrap with cooking spray to prevent it from sticking to risen buns). Let rise in warm place for 30 minutes or until doubled. Pre-heat oven at 375 degrees and place baking pan filled with 1" of water in the oven while pre-heating.

Bake buns for 12 minutes or until golden brown on top.

Note: You can shape this dough to be any type of bun you want (sub, hot dog, etc.)

Saturday, February 10, 2007

Blog Party #19: Take Comfort...in Foods from My Home State

After last month's formal affair, our hostess of the Blog Party, Stephanie of Dispensing Happiness has declared February's theme to be Take Comfort. Considering the frigid weather we have been having in the northeast for the past two weeks, comfort food made bite size for and a warm drink will be perfect to share with friends new and old while we stand beside a roaring fire in the winter gloaming.

For this month's little shindig, I've decided to bring a dish from my home state of Michigan, Mini Yooper Pastys or Pasties depending on what part of the Upper Peninsula (UP) you go to buy your pastys (and NO...not those kind of pasties, jheesh).


To wash these flaky but filling little meat pies down, I've also brought along another Michigan original, Vernor's Ginger Soda!


It is much spicier than your normal ginger ale and the bubbles will make you sneeze. You can either have it straight up and ice cold (the way I like it) or served as a drink called a Hottness (I've got the spiced vodka right here in my hip flask) and if Stephanie has some vanilla ice cream somewhere in her freezer, you can make a Boston Cooler. Finally, if you are really talented (and deranged) you can make a Michigan Tech Boilermaker (beer in a pint glass, shot glass of Vernor's dropped to the bottom of the glass upright with Vernor's still in shotglass).

Pastys are originally from Cornwall, England where they were made for Cornish miners to take into the mines as meals. They were brought to the UP in the late 19th century by Cornish miners who came to work the iron and copper mines. Every miner's wife had her own recipe she used. Some were filled with sliced meat, others with ground meat. Some had purple turnips, some had rutabagas, some had only potatoes and carrots. My great great grandfather on my father's side was a miner in the Keweenaw Peninsula and the recipe I use is the one that my great great grandmother used except I don't use suet or lard but Crisco. Her pasty was filled with diced turnips, onions, potatoes, and ground venison. Over the years, the meat has changed to ground beef or a mixture of ground venison and beef. Normal sized pastys are huge!! (They were meant to fuel a miner for a 12-14 hour shift). They are about the size of one half dinner plate and are normally served smothered in gravy.

For our finger food version, we are going to roll out the dough to form a circle a little bigger than a dessert plate. Using a saucer as a pattern, we will cut out a circle that is about 6" in diameter. Using our rolling pin as a support for one half of the dough we'll evenly place about 3 Tbsp of diced turnips, onions and potatoes that have been seasoned with salt and pepper in the center.


Making sure there is a border of about 1 1/2" on the filling side, we'll then place 2 Tbsp of ground beef seasoned with salt, pepper and parsley that has been formed into a little half moon shape on top of the diced veggies.


We'll then place a little sliver pat of butter on top the meat and fold over the top crust, tucking it around the filling. We'll finish up by wrapping the 1 1/2" border up, over, and tucked down to make a really tight seal. A little prick on top to let the steam out and a bit of a milk wash complete the pasty.


Into a 400 degree oven for 40 minutes and out comes a golden pasty, ready to be placed on a little party plate with a side of gravy for dipping!


Mini Yooper Pastys
Adapted from my great great grandmother Burgess

Serves 8

Crust:
3 cups all purpose flour
1 1/8 cup Crisco
1/4 tsp salt
6-7 Tbsp cold water

Combine salt and flour in large bowl. Cut Crisco into small chunks and using a pastry blender, cut Crisco into flour mixture until flour mixture looks like tiny peas. Don't worry about keeping the Crisco in large chunks. This crust should be a hardy crust not super flaky. Add cold water, one Tbsp at a time, until the dough is almost play dough consistency. Pull dough into a round ball and cover with towel. Let sit for 10 -15 minutes. Make the filling.

Filling:
1 1/2 pound ground beef
1 medium purple turnips finely diced
2 medium potatoes (Yukon Gold), finely diced
2 medium carrots (fat ones work best), finely diced
1 medium yellow onion, finely diced
salt
pepper
parsley
butter

(note: I have no idea how much salt, pepper, and parsley is really in this recipe. I learned to make these by watching my grandmother. She always used about a quarter size dollop of salt in her palm x 2 and a quarter size dollop of pepper. For me, a quarter size dollop is about a tsp).

In medium bowl, combine turnips, potatoes, carrots and onions. Season with about 2 tsp of salt and 1 tsp of pepper. Set aside. In another medium bowl, mix ground beef with about 2 tsp of salt, 1 tsp of pepper, and 1 1/2 tsp of parsley (1/2 tsp = a nickel). Set aside.

To make a pasty:

Turn dough out onto lightly floured surface. If dough is really sticky, knead in a bit more flour (1 Tbsp at a time) until the dough is moist but not stiff. Divide dough into 8 pieces. Roll each piece out into a circle about 7" in diameter. Using a saucer as a pattern and a sharp paring knife, cut out a circle about 6" in diameter (set aside the scraps to patch any torn pastys). Using the rolling pin to support one half a dough circle, spread about 3 Tbsp of veggie mixture on the the opposite side of the dough circle; leaving 1 1/2" border on the filling side of the dough (see pictures above). Take about 2 Tbsp of ground beef mixture, shape into a little half moon and place onto top of veggies. Place a pat of butter on top of the ground beef. Fold over the top half of the dough and tuck/seal around filling (if dough tears, use scraps to patch). Tuck over the top half seal, the 1 1/2" border crimping and sealing tightly. Prick top of pasty with a sharp knife to create a steam hole. Place on cookie sheet lined with parchment paper in pre-heated 400 degree oven. Bake for 40-45 minutes until crust is golden brown. Serve warm with gravy for dipping.

Thursday, February 08, 2007

Retro Recipe Challenge #6: The Way to a Man's Heart...

This month's Retro Recipe Challenge, hosted every month by the lovely Laura Rebecca, has us cooking something for our honey for Valentines Day. This is a bit tough for me since we celebrate "anti-Valentines Day" in our house. Which actually is really nice because I never know when MBH is going to decide to hold an "Anti-Valentines Day" and surprise me with a small token of his affection like the package of pocket sized Moleskines he got for me a few weeks ago to jot down book titles, recipe ideas, and random thoughts or the Digital Food Photography book he gave me to celebrate the launch of Breadchick.com. Thus, I wasn't really planning on participating this month as I cook something special for MBH every day.

Until that is I stumbled upon a section in the McCall's Show-off Cookbook published in 1965 as part of the McCall's Cookbook Collection called "Cook Your Way Into His Heart with Our Man-Tested Menus". After finding this gem of a section, I knew I had to rethink my whole plan of not cooking for this RRC. I mean how can any 21st Century woman resist trying out a "Man-Tested Menu"??!! Especially when enticed by this wonderfully crafted opening paragraph:

"If it's true that the way to a man's heart is through his stomach, then all a girl needs to achieve that end is a working kitchen and our man-tested menus. All planned with malice aforethought, these recipes are designed specifically with your man in mind. We can almost guarantee that you can cook your way into his heart - and live happily ever afterward."

WOW! With a statement like this I just HAD to try something from one of the "Man-Tested Menus"!

As you may recall from an earlier post, I use food as a motivational tool at work (ok, it really is a bribe). I knew this week's special project engineering meeting was going to be a particularly tough meeting. I have several projects with tight deadlines that need to have custom product developed for the projects. I also know that our engineering group is stretched to the max on the type of projects they can take on right now. So, as the only woman in the entire engineering group, I did what any self respecting woman of the 50's and 60's would do...I baked a cake. Not just any cake either but the Old-Fashioned Coconut Cake from the "Man-Tested Menus"!!

Girls, let me tell you this cake is four layers of pure coconut heaven. It is a classic all white cake with all white frosting with generous amounts of shredded coconut pressed into the frosting and liberally sprinkled between the layers AND IT IS TO DIE FOR. It is everything you expect a coconut cake to be: moist and dense, with a good dose of coconut flavouring with every bite. This cake isn't a start from a white cake mix type cake either. This is a whipping six egg whites, sifting cake flour, creaming butter, and adding the flour/milk in four parts starting with the flour and ending with the flour, don't go running through the house because the cake might fall type of cake. The frosting isn't for the faint of heart either. This frosting is the full on, bring the sugar and egg whites to soft-ball stage while you stand over a double boiler with your egg beaters going Seven Minute Boiled Frosting.

And I'll tell you what...if the reaction I got this morning during the engineering meeting when I opened the cake carrier and started handing out slices of this beauty are any indication of the results of using a Man-Tested Menu, then I say ladies, go get your man (and your egg beaters)!!!


Old Fashioned Coconut Cake
From McCall's Show-Off Cookbook (1965)

Cake:
3/4 cup egg whites (about 6)
2 3/4 cups sifted cake flour
3 tsp baking powder
1/2 tsp salt
1 1/2 cups sugar
3/4 cup soft butter
1 tsp vanilla extract
1/2 tsp almond extract (I used coconut extract)
1 cup milk

In small bowl of electric mixer, let egg whites warm to room temperature (note: let ALL your ingredients come to room temperature, they conveniently leave that little nugget about baking cakes from scratch out because they assume you know this because you always bake your cakes from scratch and your mother taught you this!). Meanwhile, preheat oven to 350 F. Grease well, flour and layer with a circle of wax paper three (8 by 1 1/2 inch) or two (9 by 1 1/2 inch) cake pans. Sift flour with baking powder and salt into a medium bowl and set aside. At high speed, beat egg whites until foamy. Gradually beat in 1/2 cup sugar, 2 Tbsp at a time, beating well after each addition. Beat until soft peaks form when beater is slowly raised. Set aside. In large bowl of electric mixer, at speed, cream butter with rest of sugar and the extracts until light and fluffy. At low speed, beat in flour mixture (in fourths) alternately with milk (in thirds), beginning and ending with the flour mixture. Beat in egg whites just until batter is smooth, about 1 minute. Pour batter into prepared pans (about 1/2 full); bake 25 minutes or until surface springs back when gently pressed with fingertip. Cool in pans for 10 minutes. Remove from pans; cool throughly on wire racks.

Frosting:
1/4 cup egg whites (about 2)
3/4 cup sugar
1/2 tsp cream of tartar
dash salt
1 cup heavy cream
1 tsp vanilla (I used 1/2 tsp vanilla and 1/2 tsp coconut extract)
2 cans (3 1/2 oz size) flaked coconut (I couldn't find this in a can, so I used bagged flaked coconut)

In top of double boiler, combine egg whites, sugar, cream of tartar, salt, and 2 Tbsp water. With portable mixer or rotary egg beater, beat about 1 minute to combine ingredients. Cook over rapidly boiling water (water in bottom should not touch top of boiler), beating constantly about 7 minutes or until stiff peaks form when beater is slowly raised. Remove from boiling water. Transfer frosting to medium bowl; cool completely. In small bowl, whip cream and vanilla until cream is stiff enough to hold its shape. Fold cream mixture and one can (1 cup) of coconut into cold frosting, with rubber scrapper, using an under and over motion and mixing until blended.

Putting the Cake Together:

Slice any "peaks" off the tops of the cakes so each cake is fairly flat (save this for a treat for the kids or for a dessert) Slice each cake into two layers. Starting with a bottom on the bottom, put a layer of frosting on top and sprinkle with coconut. Repeat until all the layers are used, finishing with a bottom with the flat part on top. Fill and frost the sides of the cake and then frost the top. Using a cupped palm, lightly press loose coconut into the sides and sprinkle any remaining coconut on top of the cake. Chill for one to three hours before serving.

Serves 10

Sunday, February 04, 2007

This Isn't Your Mother's Microwave


What do you get when you combine chocolate, coconut, almonds, and graham crackers with a microwave?

Instant Gooey Satisfaction...

Chocolate Almond Coconut Bars
adapted from Introduction to Cooking with the Amana Radarange Microwave Oven

6 Tbsp butter
1 1/2 cups graham cracker crumbs
1/3 cup sugar
1 cup toasted almond slivers
10 oz sweetened condensed milk
1 3/4 cup flake coconut
1 12oz pkg semi sweet chocolate chips

Melt butter on high until melted in a 8" x 8" x 2" glass baking dish. In small mixing bowl, mix graham cracker crumbs and sugar. Add graham cracker and sugar mixture to melted butter. Combine and press evenly and firmly into bottom of baking dish. Microwave on high for 1 to 1 1/2 minutes or until firm. Sprinkle almonds evenly over graham cracker crust. In same mixing bowl used to mix graham cracker crumbs and sugar, combine the coconut and condensed milk. Using a spatula, spread on top of almonds. Microwave on high for 4 minutes or until firm (if your microwave doesn't have a carousel, turn 1/2 way through cooking time). In medium glass bowl, melt chocolate chips in microwave and spread on top of coconut layer. Cool until chocolate is hard. Cut and serve.

Friday, February 02, 2007

Random Food Musings from a Commute

WHEW! We made it to Friday!!!

It has been a long week for both MBH and I. My new boss was in town from our corporate headquarters the first part of the week meaning long days at the office and little cooking went on at our house. MBH had a flurry of interviews and I am very excited to report that starting Monday he will be gainfully employed again!!! I'll be fixing one of his favourite meals tonight to celebrate.

I'm not sure if it was the busy week we both had or the cold weather but my creative food juices seem to have gone on Holiday (If they are smart, they went to Nevis or St. Lucia to laze around on the beaches in quiet solitude). I wandered around the kitchen on autopilot most of the week with the exception of Wednesday night when I made an interesting dish I'll be posting about over the weekend. Otherwise it was some old standbys and one night of take out.

I stumbled upon and was directed to a few interesting food sites this past week but by far my favourite was Airline Meals.net; a review site of the food offered on the airlines of the world. The site encourages travelers to take food pictures of the meals they are served and rate them. There was even a section for the crews to rate the meal the 'company' provides. No surprise that US airlines ranked very low in the reviews, since unless you are in First Class (and even then not always) in the US Airlines don't offer much in the way of food any longer. If you have ever wondered what they serve for meals on Aero Mongolia, you can find it here. I loved looking at what other parts of the world serve as breakfast on airplanes.

A few of my favourite food bloggers all got together this past weekend and embarked on the Mount Everest of pastry making: flaky croissants. You've heard of movable feasts and dessert runs right? Well, these fine ladies, lead by Lis of La Mia Cucina, have a little cooking bee every month. If you haven't read these posts, I completely encourage you to visit over at their sites and read about their adventure with puff pastry. Make sure your mouth isn't full of coffee, tea or anything else though whilst reading their "round-up". Speaking of which....does anyone know how to get tea gunk off your monitor??

I think it is time to pull out the sweet starter from the fridge and bake with it either Sunday or Monday. I'll do that tonight when I get home and before I embark on MBH's celebratory dinner. I haven't baked with it in about five months so it will need two days to get going again. I've also been toying with the thought of making a "Herman" but every time I get close, I think I need another starter in my fridge like I need another hole in my head. Any thoughts on what I should bake with my sweet starter?

I can't wait until tomorrow. Not only is it Saturday but I've been craving dim sum. I see Boston's Chinatown in my future...

Saturday, January 27, 2007

Weekend Cookbook Challenge #13: From My Newest Cookbook - a Bit o' Lake Fare

For this month's installment of the Weekend Cookbook Challenge hosted by Sara of I Like To Cook, we are asked to cook a recipe from our newest cookbook. If you know me well, you will know this a very appropriate and ironic theme. As a cookbook-aholic, I acquire a new cookbook on average every 5.7 days and every once in a while go on a huge bender! Since Sara posted this month's challenge theme, I have purchased or been given fourteen new cookbooks. Given the speed with which I accumulate cookbooks, I am always in the state of cooking from a new cookbook. Since I couldn't honestly decide which new cookbook to use for this challenge, I gathered the bounty from the past month, tossed them onto the guest room bed, closed my eyes and grabbed one and...


I couldn't have been happier with the winner of my grab-a-cookbook, Ships of the Great Lakes Cookbook!


I received the Ships of the Great Lakes Cookbook as a Christmas present from my folks this year. This book is about two of my hobbies...um make that passions: cooking and being a boatnerd (a person who follows almost rabidly the comings and goings of Great Lakes freighters or Lakers ). Lakers are famous for their hearty, filling and delicious food. Next to the captain and the chief engineer, the most important person on the crew is the cook (also know as the steward). They feed up to 29 men three full meals a day; no matter the weather or the mood of the Lakes plus make sure there are plenty of treats, snacks, and left-overs so that the crew of these behemoths of the Lakes (average size of a Laker is over 700' long) can always get something to eat. One of the best chocolate chip cookies and definitely the coldest milk I ever had in my entire life came from the galley of the Paul R. Tregurtha, a 1,000 Footer that makes trips during the sailing season (late March until late January) between the iron ore mines along the western shores of Lake Superior to the steel mills located in Gary, Indiana on Lake Michigan and the mills in Ohio along the southern shores of Lake Erie. To learn a bit more about the galleys of Great Lakes freighters you can go listen to an episode of "Hidden Kitchens", a series from the Kitchen Sisters heard on NPR radio.

Ships of the Great Lakes Cookbook features recipes actually used in the galleys from not only the Lakers but also from some tall ships that ply the lakes, passenger ships and ferries from a long gone by era, Coast Guard cutters assigned to the Lakes, and "retired" ships that are now museum ships like the Valley Camp and the Mather. Some of the recipes have been cut down to make servings for the home but quite a few are published just as they are written. So a home cook would have to do some adjusting; unless of course you DO want to make 24 servings of the Hungarian Beef Goulash served on the M.V. Canadian Progress or eight loaves of white or rye bread from the M.V. Oglebay Norton (now the American Integrity). There is even a tongue in cheek recipe for the "Best Fruit Cake Ever!" contributed by a wheelsman from the S.S. Courtney Burton (now the American Fortitude) that calls for 1 to 2 quarts of whiskey and has directions like "check the whiskey" every few steps. As the recipe for the fruit cake progresses directions like "add 1 babble spoon of brown uger or what ever colour you can find" followed by another "check the whiskey" begin to appear. Each section of the cookbook features a little history about the ships, the crew, and most importantly the cook on board whose recipes are printed. There are pictures of the galleys, reprints of menus from Thanksgiving and Christmas (the two biggest meals served during the sailing season). Recipes range from very basic soups to extremely elaborate dishes like beef wellington. There are also recipes for quite a bit of regional fare like tourtiere (a French-Canadian meat pie), broiled Lake Superior whitefish, and Miracle Whip devil's food cake.

Trying to find a recipe to cook was hard, but I finally settled on the Walnut Bars from the galley of Dawn Weymouth, the steward on the M.V. Indiana Harbor at the time Ships of the Great Lakes Cookbook was published (stewards like most of the crews with the exception of the captains move from boat to boat each season depending on the company assignments).


There are quite a few women who have made cooking for the crews of Lakers their career and Dawn is one of the best known. I made the Walnut Bars to take work for my weekly Thursday engineering meeting. They are a layered bar cookie with a shortbread crust and then a baked topping of walnuts, brown sugar and flaked coconut. After the bar cools, you frost it with an orange/lemon flavoured frosting. I made the bar portion of the recipe on Wednesday and then frosted them Thursday morning before going to work. I doubled the shortbread crust to provide a thicker base for the walnut filling. The recipe was easy to follow and in about one hour I had the bar part of the cookie done. I let the bar cool a bit and since the filling was toffee like, I cut the cookie into bars before I let them cool in their pan completely. These bars are fantastic! They are so buttery and rich but sturdy and the frosting is a perfect flavour foil for the sweet filling and shortbread crust.


I was told after our meeting that in no uncertain terms they were to go into my regular rotation of bribes. After tasting these wonderful treats I can definitely see why the walnut bars are a crew favourite and as the story about the Indiana Harbor's galley says they "don't last long on board either!"

Walnut Bars
From the Galley of Dawn Weymouth, Steward of the M.V. Indiana Harbor

Crust: (I doubled this for a thicker crust)
1 cup flour
1/2 cup butter
2 Tbsp powdered sugar

Filling:
2 eggs, beaten
1 1/2 cup brown sugar
2 Tbsp flour
1/4 tsp baking powder
1/2 tsp salt
1 tsp vanilla
1 cup walnuts, chopped
1/2 cup flaked coconut

Frosting:
1/2 cup powdered sugar
2 Tbsp butter
2 Tbsp orange juice
1 tsp lemon juice

Pre-heat the oven at 350 degrees. To prepare the crust, combine all the ingredients and press into the bottom of a 9 x 13 baking dish. Bake for 12 to 15 minutes or until slightly golden. Combine the filling ingredients and mix together well. Spread the filling over the warm crust. Return the pan to the oven and bake an additional 25 minutes; check after 18 minutes as the bars may be ready. (The filling will be golden brown and look like hardened lava). Let cool about 15 minutes and cut into bars. Let bars finish cooling completely before frosting. To make the frosting, combine all the ingredients and beat until very smooth. Spread over the cooled filling.

Great with a cup of espresso or a tall glass of very cold milk!

Note about this post: A special Thanks! (and a Salute) go to fellow Boatnerd, Dick Lund who let me link to his awesome site for the pictures of the boats and links to the "Boats" mentioned in this post.

1/30/07 Update: I received a very wonderful email this morning from the author of "Ships of the Great Lakes Cookbook", Paula McKenna. It was very nice of her to send a note of thanks, especially since she is a fellow cookbook-aholic, boatnerd and publisher of cookbooks as well as a cookbook author (Can you say DREAM Job!) If you are interested in ordering "Ships of the Great Lakes" you can order it from her company's website: Creative Characters Publishing. They are updating the webpage right but there is phone number you can call to place your order.

Friday, January 26, 2007

Fiery Food for a Frigid Friday

Finally!! I do believe that winter has come to Boston. Today the high was a whopping 10 degrees Fahrenheit (-12C). When you factored in the wind chill, it was bone chilling -5. It was so cold this morning during my commute that my toes never got warm despite the woolen socks and heavy trousers. In other words the perfect weather for homemade chili!

We had a chili a few weeks ago when it wasn't very cold, only coolish out. That batch was made by MBH and was O.K, but we both thought it could have been better. Maybe we just needed a nice blast of arctic air. Whatever the reason, tonight's batch was exactly what we both needed to warm up from our toes to the tips of our nose!

We use a package mix as a base for our chili and about a pound or little bit more of 93% lean ground sirloin along with a can of kidney beans, half an onion, a can of tomato sauce and if we are going to go for a little spice a can of diced tomatoes and chilies.


We've tried a couple different brands of mixes but the one we like the best is the Wick Fowler's 2 Alarm Chili Mix. It contains seven packets of seasonings: red pepper, chili powder, cumin and oregano, paprika, dried onion and garlic, salt, and masa harina.


I also like to add a little additional cumin, chili powder, and cinnamon to the chili (about 2 tsp of each) while I'm browning the ground beef. Adding these three spices at this step infuses the meat with a spicy smoky taste. After draining the ground beef (normally very little fat is left to drain with 93% lean ground beef), I toss in the chopped onions and let them cook until soft and translucent, the spices combining with the onions for a very flavourful mixture.


Next step is to put all the packets of seasonings from the mix in with the exception of the salt, red pepper, and masa harina. I save these for the very last minutes of cooking. This is also where I add the can of beans (undrained), the tomato sauce, the can of chopped tomatoes and chilis and one can of water (use the tomato sauce can to measure the water). I put a lid on the pot and let it simmer slowly. I keep a second can of tomato sauce handy in case I want to lighten out the taste of the spices and a refilled can of water if I need to add more liquid. I taste the chili several times during this simmer to make any adjustments to the seasonings and liquid. After it has simmered for about twenty minutes, I make any last additions to the seasoning. This is where I add the salt and the red pepper if we are going for 3 Alarm strength. I don't use the whole salt packet, just enough to punch up the spices. I let the chili simmer for about ten more minutes. While the chili is simmering for the ten minutes, I mix the masa harina with about 1/4 cup of warm water to make a thick batter. I stir in about 2/3 of this mixture into the chili to make it "spoon stand-up" thick and put the lid back on to let the chili simmer for an additional 10 minutes. This allows the masa harina to cook and all the flavours to really come together!

Sometimes I make a batch of yellow cornbread to go with our chili but tonight I went for little round white corn chips and a sprinkle of cheese on top.


Both MBH and I cleaned our bowls and agreed chili was exactly the right food of warmth for this very chilly night...

Fiery Food for a Frigid Friday

Finally!! I do believe that winter has come to Boston. Today the high was a whopping 10 degrees Fahrenheit (-12C). When you factored in the wind chill, it was bone chilling -5. It was so cold this morning during my commute that my toes never got warm despite the woolen socks and heavy trousers. In other words the perfect weather for homemade chili!

We had a chili a few weeks ago when it wasn't very cold, only coolish out. That batch was made by MBH and was O.K, but we both thought it could have been better. Maybe we just needed a nice blast of arctic air. Whatever the reason, tonight's batch was exactly what we both needed to warm up from our toes to the tips of our nose!

We use a package mix as a base for our chili and about a pound or little bit more of 93% lean ground sirloin along with a can of kidney beans, half an onion, a can of tomato sauce and if we are going to go for a little spice a can of diced tomatoes and chilies.


We've tried a couple different brands of mixes but the one we like the best is the Wick Fowler's 2 Alarm Chili Mix. It contains seven packets of seasonings: red pepper, chili powder, cumin and oregano, paprika, dried onion and garlic, salt, and masa harina.


I also like to add a little additional cumin, chili powder, and cinnamon to the chili (about 2 tsp of each) while I'm browning the ground beef. Adding these three spices at this step infuses the meat with a spicy smoky taste. After draining the ground beef (normally very little fat is left to drain with 93% lean ground beef), I toss in the chopped onions and let them cook until soft and translucent, the spices combining with the onions for a very flavourful mixture.


Next step is to put all the packets of seasonings from the mix in with the exception of the salt, red pepper, and masa harina. I save these for the very last minutes of cooking. This is also where I add the can of beans (undrained), the tomato sauce, the can of chopped tomatoes and chilis and one can of water (use the tomato sauce can to measure the water). I put a lid on the pot and let it simmer slowly. I keep a second can of tomato sauce handy in case I want to lighten out the taste of the spices and a refilled can of water if I need to add more liquid. I taste the chili several times during this simmer to make any adjustments to the seasonings and liquid. After it has simmered for about twenty minutes, I make any last additions to the seasoning. This is where I add the salt and the red pepper if we are going for 3 Alarm strength. I don't use the whole salt packet, just enough to punch up the spices. I let the chili simmer for about ten more minutes. While the chili is simmering for the ten minutes, I mix the masa harina with about 1/4 cup of warm water to make a thick batter. I stir in about 2/3 of this mixture into the chili to make it "spoon stand-up" thick and put the lid back on to let the chili simmer for an additional 10 minutes. This allows the masa harina to cook and all the flavours to really come together!

Sometimes I make a batch of yellow cornbread to go with our chili but tonight I went for little round white corn chips and a sprinkle of cheese on top.


Both MBH and I cleaned our bowls and agreed chili was exactly the right food of warmth for this very chilly night...

Wednesday, January 24, 2007

Sacked Cupcakes


MBH and I have a long running private joke that is simply the first three lines from John Wray's sailing adventure "South Sea Vagabonds":

"You got the sack?"
"Eh, yes, I got the sack"
"Oh, you got the sack."

We pull this "joke" out at what seems to us an appropriate time and it always results in the two of us smirking or out right laughing; much to the confusion of anyone around us (It is an obscure book and since most people have not read it, they have no idea what we find funny about those three sentences). Monday, MBH called me around lunch time to tell me he was laid off from his job as a programmer for secure messaging company. The company ran out of money and as a result the entire company was "sacked". On treat day too! I had sent in to work with MBH that very morning two dozen chocolate and vanilla cupcakes frosted in the flavour appropriate butter cream frosting you see above.

In Wray's book, he got the sack for lack of care and day dreaming. He went home and with his last 4 pound sterling and 40p, built a sailboat in his parent's front yard; fulfilling a dream of his to spend the rest of his life sailing from island to island around New Zealand and Australia. He eventually sailed all over the South Seas on his boat, the Ngataki and wrote his absolutely wonderful tale in the 1950's. MBH isn't planning anything so drastic as building a sailboat in our front yard or running off to the South Seas . He has already called a few head hunters he has worked with in the past and had two interviews yesterday. He will have another position in a matter of weeks; especially since cryptography/computer security and "dead" computer languages are his specialty. In the meantime, his current state of unemployment means more time for reading and writing on his part. And of course, messing with our cat, LB; who I'm sure will be quite happy to have company during the day.

I hope the VP of Customer Support enjoyed the cupcakes I sent in with MBH. They will have to tide him over for a very long time...

Thursday, January 18, 2007

Blog Party #18 - Black and White: As classy as they come

Today finds us getting all dressed up in the classic colours of black and white to attend a Blog Party in MBH's home state of Tennessee. This classy party is hosted by Stephanie of Dispensing Happiness. And while our party may not include the likes of Candice Bergen, Frank Sinatra, Katherine Graham, Bennet Cerf, Norman Mailer, George Plimpton, and the all those boring assorted Rockefellers and Vanderbilts who graced Truman Capote with their presence at THE Black and White Ball, I'll bet this one has better food and less tedious people in attendance...

In keeping with the party theme, we are suppose to bring both a munchie and a drink that is black and white. To pass around the room, I've brought something a bit old fashioned in the form of Black and White Checkerboard Refrigerator Cookies. To drink, I've contributed a bartender AND something equally decadent; a Godiva Chocolatier liqueur based drink called a Black and White Cherry.

The Black and White Checkerboard cookies where pretty simple to make and the effect is quite lovely as you can see.


I used the "Icebox Butter Cookie" recipe from Martha Stewart's Baking Handbook (this has become my favourite recipe from this cookbook) for the dough. I kept half the dough the vanilla butter from the recipe for the white part of the checkerboard. The black part of the checkerboard cookie was screaming "MOCHA!" at me. So, I added two additional tablespoon of sugar, two squares of melted unsweetened baking chocolate, and 2 tsp of espresso powder to the other half of the dough. I then made four 18" logs (two white logs and two black logs) and sat a white log and black log side by side. Then on top those two logs, reversed the pairing. These cookies are so good I think they are going to be a standard in my house.

I wish I could say I liked the Black and White Cherry as well as I liked the cookies (I'm sure it isn't the bartender's fault). While on paper the drink looks really spectacular, I actually found it a bit well...too much of a good thing, a cherry cordial on vodka. The recipe calls for both chocolate and white chocolate flavoured Godiva Liqueur and cherry and vanilla flavoured vodka to which you add heavy cream, chocolate ice cream, and ice cubes; which all goes in the blender. After quite a bit of racket that disturbed the cat's mid-afternoon nap, I had a frothy and very boozy milkshake that was garnished with fresh whipped cream (what else is a girl to do with the remainder of the heavy cream?) and microplaned Belgian chocolate.


I think this drink would be better without the chocolate ice cream and served in a brandy snifter versus the Tom Collins glass in the recipe. Or maybe with hot chocolate as the base and served warm in a mug. But I will let you be the judge...

Well, I see a few fellow blog-friends over on the other side of the room and I am blocking the way to the bar. Enjoy the rest of the party and it is always lovely to see you!

Black and White Cherry

1 oz Godiva chocolate liqueur
1 oz Godiva white chocolate liqueur
1 oz heavy cream
1 oz cherry vodka
1 oz vanilla vodka
2 scoops chocolate ice cream
13 ice cubes

Combine all ingredients in a blender.
Blend until the ice is crushed and the entire drink is creamy.
Pour into a Tom Collins glass.
Garnish with whipped cream, cherry or shaved chocolate, and serve

Wednesday, January 17, 2007

And the winner is...


Last December I participated in the Menu for Hope III, a food blogger raffle host by Chez Pim. This year the proceeds from Menu for Hope III benefited the UN World Food Programme. I am very happy to say that we raised an incredible $60,925.12!!! My raffle prize was a box of L.A. Burdick Chocolates signature mice and the randomly selected winner of that tasty prize is Cin. Congratulations!

I just ordered those tasty buggers for her and as I type they are being rounded up and plopped into their little wooden box to start their journey to Cin.

A huge "Thanks" to all of my readers who donated to Menu for Hope.

Sunday, January 14, 2007

My Favourite Sunday Brunch Fare: A New Way

Today is one of the first days where it actually feels like winter. It's cold, raining, and by nightfall we might even have some snow! In other words, the perfect morning for reading the Sunday New York Times, lingering a bit longer than normal at our coffee shop, and brunch. I've been craving brunch for the past few weekends but neither MBH nor I have been able to coordinate our schedules to allow for a nice mid-morning meal. My all time favourite dish for brunch is eggs Benedict. I love the way the runny yolk of the poached egg soaks down between the Canadian bacon (also known as Back Bacon) and the English muffin and then there is the Hollandaise sauce... Unfortunately, traditional eggs Benedict with its 860 calories and 56 grams of fat per "muffin" (muffin = 1 egg Benedict) can't be on my menu while I'm doing the 30/90 plan. Luckily, Cooking Light came to my rescue!

This month, Cooking Light started a monthly feature called Essential Ingredient where the editors will examine an ingredient that is absolutely necessary for food to taste good, cook correctly or required for good health. This month's ingredient is butter. Now wait a minute, isn't the name of the magazine Cooking Light? And isn't naming butter the first "essential ingredient" a bit of an oxymoron? I thought so when I saw the feature in the content page. But after reading the article, I understood why it was chosen. You see, a small amount of fat is necessary to give food a pleasing flavour and butter is the best fat for providing flavour. It is key to browning in baking and roasting. The trick to using butter while cooking healthy is to use small amounts in ways that give you the most "bang" in the flavour department while minding the fat. The article is really interesting with lots of little tips on how to use butter sparingly but take advantage of the flavour and crisping that butter offers. It is also chock full of recipes ranging from chicken Kiev to Butterscotch Blondies and Eggs Benedict Florentine with Creamy Butter Sauce.

The Cooking Light recipe calls for substituting a buttermilk based sauce for the Hollandaise sauce and scrambled eggs made with eggs and egg whites for the poached egg. I made a few modifications/substitutions to their recipe to make it even lighter and more flavourful. I used Egg Beaters instead of whole eggs and a low sodium/low calorie Canadian bacon our local supermarket stocks. I also added fat free Feta cheese and sauteed garlic with the spinach. Putting the recipe together took about 40 minutes but the result was worth the effort. This version of eggs Benedict was one the best I've ever had! The "mock" Hollandaise sauce was creamy but light tasting and I loved the garlic sauteed spinach. I served my eggs Benedict with a side of strawberries and blackberries and a small glass of orange juice. And now for the amazing part of this recipe. The total calorie/fat content is 524 calories and 17 grams of fat for two muffins! Now that is a dish I can indulge in...


Eggs Benedict Florentine with Creamy Butter Sauce
Adapted from the Jan/Feb 2007 Issue of Cooking Light
Serves 4 (2 muffins per person)

Sauce (makes about 1 cup of sauce):
1 Tbsp cornstarch
1/2 cup water
1/3 cup low fat buttermilk
2 large eggs (I used 1/2 cup Egg Beaters)
2 Tbsp clarified butter
1/2 tsp salt

Scrambled Eggs:
cooking spray (I used butter flavoured Pam)
1/2 tsp minced garlic
1/4 tsp salt
1/4 tsp freshly ground black pepper
6 large egg whites
4 large egg
(I used 1 cup Egg Beaters)

Remaining Ingredients:
cooking spray
6 cups fresh spinach, trimmed
4 English muffins (I used Thomas 100 Calorie)
8 slices Canadian bacon
3 Tbsp chopped fresh chives
1/4 tsp fresh ground pepper
1/4 cup fat free Feta cheese
1 Tbsp minced garlic

To Make the Sauce:
Place cornstarch, water, buttermilk and eggs in the top of a double boiler and whisk together until cornstarch is well blended. Cook over simmering water until thick and mixture reaches 160 degrees, stirring constantly. Stir in butter and salt. Remove from heat, put lid on double boiler (keep top part over the simmering water) and keep warm.

To Prepare Eggs Benedicts:
Whisk together eggs, 1/2 tsp minced garlic, salt and pepper in large bowl and set side. Lightly coat large saute pan with cooking spray. Add spinach and 1 Tbsp of garlic to pan and coat lightly with cooking spray. Saute over medium high heat until spinach is slightly wilted. Place in bowl and cover to keep warm. In same saute pan, lightly brown Canadian bacon. Remove and keep warm. Using a fork, split English muffins and toast lightly. Place two on a plate. Using the same saute pan, spray with cooking spray and over medium heat, add egg mixture. Allow to slightly set before scrambling with spatula. While eggs are cooking, place one piece of Canadian bacon on each muffin and sprinkle a bit of Feta cheese on each piece of bacon. Place 1/4 cup scrambled eggs on top of each muffin, top with 1/4 cup of garlic sauteed spinach and drizzle 2 Tbsp of sauce over each muffin. Sprinkle with chives and fresh ground pepper.

Serve with 1/4 cup of fresh fruit

Friday, January 12, 2007

Command Performance

With the holidays, my trip "Up North", and then being sick, I haven't sent baked goodies to work with MBH the past three weeks. Yesterday I received the following email from him while we were both at work: "The VP of Customer Support came in and told me in no uncertain terms that he and his crew expect cookies on Monday! ;-) I said I would pass it on..."

I was planning on baking a few classic cookie jar cookies this weekend to send to MBH's parents. So, adding a few more dozen won't be tough. On the cookie menu for the weekend are oatmeal raisin, Toll House, snickerdoodles, black and white checkerboard refrigerator cookies, and another adaption of the Dorie Greenspan World Peace cookies I've been thinking about trying. There is also a request from one the guys in MBH's department to make some biscotti. I've never made biscotti before but I always like pistachio biscotti and have some pistachios that I've been saving to bake with. The recipes I've looked at for biscotti look pretty easy and quick.

Since MBH has Monday off for Martin Luther King Day, his crew will have to wait until Tuesday for their "demanded" treats. Of course, that gives me one more day to bake up a storm...

Wednesday, January 10, 2007

"Thirty in Ninety"

I've been debating all day about posting on this subject. MBH encouraged me this morning to do so. "It's food related", he said. The subject I've been debating about all day is in the title of this post; which refers to how many pounds I have to lose in how many days on doctor's orders or face being put on medication to lower my blood pressure and cholesterol.

I basically figured I would get read the riot act when I went in for my full workup this year. Both sides of my family have histories of hypertension, diabetes, strokes and heart attacks and after my mother's heart attack around this time last year, I had already determined I needed to lose weight, watch what I eat more carefully and get back to exercising more vigorously than I do. But, it was the threat of medication that finally kicked me into high gear. I hate taking prescribed medicine unless I absolutely have no choice. "How much do I need to lose in order to NOT be put on the medicine", I asked. My doctor did some quick calculation, consulted a chart on the wall, then she turned to me and said, "You have ninety days to lose thirty pounds. We'll see where you are in April and if I'm not satisfied you are going on those meds." Basically, this all boils down to ten pounds a month or 2.5 pounds a week. Pretty sensible and achievable if you ask me.

When I got home and told MBH what my doctor had told me, he just gave me one of his "told you so" looks and promptly found a few nifty tools on the web for me to help track my progress (Calorie King's food guide, Jeremy Zawodny's weight/calorie spreadsheet). I am glad I renewed my subscription to Cooking Light. I have a feeling I'm going to be scouring the issues for ideas and menus. I also picked up two GAIAM "Quick Start" DVDs from Borders (Pilates and Yoga). I'd always wanted to try both and figure now is my chance.

Now reader, I'm not going go on some whacky "eat four dozen eggs a day" diet. I'm just going to do some sensible changes in my daily routine, the meals I cook, and keep closer track on what I eat (I'm journaling every little thing I eat and the calories...sigh). More importantly, I am MOST DEFINITELY not going to turn The Sour Dough into an all "30/90" blog that goes into minute detail on my day to day progress. I'm just going to play around with some of my favourite foods and see if I can lighten them up without losing the flavour and tell you about my adventures in the kitchen while I try all sorts of new things out. Consider this a chance for you and I to share a tasty and good for you recipe or two.

Oh and don't worry, there will be all the normal buttery and rich baking and not so good for you cooking going on here too! The only difference is most of it is going to work with MBH....

Tuesday, January 09, 2007

Recovering...

There hasn't been much cooking or for that matter food related things going on in our house the past four or five days. Both MBH and I managed to get some really nasty flu thing that made even the thought of food frankly awful. I know I'm sick when new issues of Bon Appetit and Cooking Light come in the mail and looking at the covers makes my stomach turn and when MBH mentions that I should watch some of my Julia Child DVDs all I can muster is to roll over in bed and groan. The most adventurous food has gotten around here was yesterday when I actually thought about eating Jello.

Anyways, both MBH and I are on the way to recovery and back at work today. We may even go for something solid for dinner tonight like a little white rice and chicken...

Friday, January 05, 2007

Mac-n-Cheese Off: One of MBH's Major Food Groups

MBH grew up challenged in the food diversity category. For MBH's there are three major food groups: meat, green beans and macaroni and cheese. I blame his mother for this sad state of food affairs. When I first met MBH he warned me that he was a very picky eater and told me tales of how bad his mother cooked. I didn't believe any of it; that is until she sent us some cookies. MBH's stories of his mother's culinary exploits were not wrong and in fact did not do her cooking justice (just for the record, MBH's mother and I get along just fine!). MBH's limited favourite foods are a survival tactic. MBH has become a bit more adventurous over the past few years but when it comes to major comfort food, macaroni and cheese still reigns supreme.

So when I read that Kevin over at Seriously Good and CookieCrumb at I'm Mad and I Eat had invited food bloggers to post their recipes for mac and cheese on January 5, I knew I finally had a reason to post MBH's most favourite recipe in my repertoire.

My mac and cheese is simple and classic and there is nothing low fat about the dish. It is full of heavy cream, eggs, butter, and three types of cheese. The key is the final 10 minutes of the recipe: broil baby broil.


So without further ado...

MBH Mac-n-cheese

2 large eggs
2 tsp kosher salt
1 tsp dry mustard
1 cup heavy cream
1/2 cup milk (whole or 2%)
4 tablespoon unsalted butter
1/2lb elbow macaroni
1/3lb shredded sharp cheddar cheese
1/3lb shredded cheddar cheese
1/3lb shredded monterey jack cheese
1 cup additional shredded cheese, reserved for last 10 minutes of cooking
(take your pick of type, we use the sharp cheddar in our house)
1 1/2 cups buttered bread crumbs (optional)

Preheat oven at 375 degrees. Mix eggs, dry mustard, heavy cream, and milk in a bowl and set aside. Cook macaroni to al dente and drain. Put butter in macaroni pan and put macaroni back into pan and stir until butter coats the macaroni. Over very low heat, add milk, heavy cream, mustard and egg mixture and stir in cheese. Stir until cheese is melted. Place macaroni and cheese into prepared 2 quart casserole dish. Bake for 20 minutes. Remove from oven and turn oven broiler on. Sprinkle top of baked mac and cheese with the reserved cheese and broil until cheese is all gooey. If using the bread crumbs, sprinkle them on for last 3-5 minutes to brown.
Technorati Tag:

Thursday, January 04, 2007

And finally...The Roast Beast

As promised, pictures of our Christmas dinner. Well, ok...not the complete dinner but the wonderful boneless prime rib roast. I'm not a huge fan of Emeril Lagasse but a few years ago I used a recipe for his "essence" from one of his cookbooks I received as a gift to season a prime rib and it was some of the best prime rib I had ever had. I used it again this year and the results were the same, moist and juicy and perfectly seasoned.


Roast straight from the 'fridge after seasoning all night with "essence"


Tying the roast nice and tight


Four hours at 200 degrees and perfectly rare with lots of nice Au Jus!

Wednesday, January 03, 2007

Weekend Cookbook Challenge #12: Brunswick Stew

This month's installment of the Weekend Cookbook Challenge is being hosted by Shaun of Winter Skies, Kitchen's Aglow ; giving Sara of I Like to Cook and the normal hostess a much deserved after holiday break. He chose a winter perfect theme of stew! Here at the Sour Dough we are big stew eaters but lately we have been in a stew rut that consists of one type of stew, beef. Sometimes we go crazy and toss a bag of frozen mixed veggies in to the pot but basically our stew consists of huge chunks of beef, potatoes, peas and carrots with a dash of red wine. MBH is always after me to introduce him to "new foods" and I had a ham bone in the freezer I wanted to use. So, I took to my seldom used cookbooks in search of a recipe that would satisfy both needs which I found flipping through the classic Mable Hoffman's Crockery Cookery, Revised Edition in the form of Brunswick Stew. A side story to this whole affair of stew is that preparing the Brunswick Stew resulted in one of the worst kitchen disasters of my thirty-some-odd-years of cooking but more on that later...
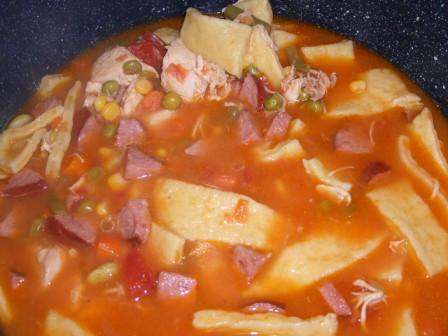
Brunswick stew is a classic stew of the southeastern part of the United States and there is a debate where it originated, Brunswick, Georgia or Brunswick County, Virginia. One thing that is not in debate is the historic recipe probably called for the use of both rabbit and squirrel as well as lima beans (or butter beans if you are from the South). Today's recipe calls for two types of meat of which one is normally chicken. The Virginia version always calls for both chicken and ham. Brunswick stew is traditionally cooked in huge stew pots over an open flame like burgoo and served after a long slow simmer, making it a natural stew for the crock pot. Which leads this tale to the kitchen disaster.

I actually made two pots of Brunswick Stew for the WCC. But, due to what can only be termed as a "bone-headed move", we only ate one pot of Brunswick Stew! The first pot of stew ended up in the garbage after I forgot to plug in the crock pot before going to work. Yup, you read that right. I forgot to plug in the crock pot. For ten long hours a crock pot full of chicken stock, raw chicken thighs, a huge ham bone, potatoes, and onions sat on my counter and did Lord only knows what. Imagine our surprise when we got home expecting those wonderful smells emanating from the kitchen in a way only cooking with a crock pot can provide and smelling...nothing. Not a thing. I dropped my briefcase and computer bag and hurried to the kitchen to find the crock pot stone cold. I checked the temperature and saw it was on low and assumed our lovely crock pot had died. It was only after several minutes did I notice the little white plug sitting beside the pot, unplugged. Now for the second "bone-headed move". MBH was sure it would be ok. "Just plug it in and let it cook overnight", he suggested. I don't know what possessed me to listen to that advice. Maybe it is the frugal cook who grew up in a home where we were admonished to not waste food. Whatever it was, it got the better of me because I plugged the crock pot in, rummaged in the freezer for a frozen pizza for dinner, and sulked through the rest of night. The next morning, I knew the stew was no good. There was a strange smell to the stew and the meat just looked all wrong. I pulled out two strong kitchen trash bags and tossed the contents of the crock pot into the bags and into the garbage determined that I would not fail with Brunswick Stew.

The following weekend I tried again. Since it was the weekend and I was home putting the final touches on the Christmas baking, I decided to pull out the enamel stew pot and make this on the stove top using the recipe from Crockery Cookery as a base. Two pounds of chicken parts, two large ham steaks, and another six cups of chicken stock later we had fabulous tasting Brunswick Stew.
Brunswick Stew

MBH wanted noodles and I wanted dumplings so I made some fat and thick homemade egg "nooplings" to add to the stew. By adding them the last thirty minutes of simmering the flour worked as a thickening agent. The result, a wonderfully smokey tasting stew to warm us on a cold winter's day. This recipe is going into rotation for a repeat sometime very soon and the "stew slump" at the Sour Dough is over...


Brunswick Stew
adapted from Mable Hoffman's Crockery Cookery

1 2-3lb chicken cut up (I used boneless breasts and thighs)
2 1/2lb ham steaks cubed
2 quarts chicken stock
3 Tablespoon salted butter
1 medium onion coarsely chopped
3 medium potatoes cubed in large pieces
2 16 oz. cans of diced tomatoes
1 12 oz package of frozen lima beans (I used a 10oz bag of mixed vegetables)
1 10 oz package of frozen corn
2 tsp salt 1/2 tsp pepper
1 tsp sugar
4 cups homemade egg noodles or dumplings (optional)

In stew pot, on medium heat, melt butter and saute onions until golden, add ham and brown. Take pot off heat and add cut up chicken, chicken stock, and potatoes to onions and ham. Return to low heat and cover. Let simmer for 2-4 hours until chicken is fully cooked and shreds into large pieces. Add tomatoes, frozen vegetables, salt and pepper. Allow to cook for 1-2 more hours at a simmer tasting often and adding salt and/or pepper as desired (careful with the salt, the slow cooking of the ham will add quite a bit of saltiness). 30 minutes before serving, add noodles or dumplings and let cook until noodles/dumplings are cooked. Serve hot in soup crocks with collard greens.

Tuesday, January 02, 2007

2007: The Year of Pie

I've never been one for making New Year resolutions. This is probably because since an early age I've been a prolific list maker. However, as I begin the year which will bring the big "Four-Oh" birthday, I have decided it is about time I make a few resolutions.

Resolution #1: I will not get so task focused in the kitchen that I lose sight of the fun and joy I get from puttering around my kitchen.

Resolution #2: I will make an attempt to introduce at least one vegetarian meal a week to our diet (MBH snorted when I mentioned this).

Resolution #3: I WILL master pie if it kills me.

I guess when I made out my Christmas wish list this year, I was subconsciously prepping for Resolution #3. MBH surprised me with a box of goodies from the King Arthur Flour's Bakers Catalogue that included a pie crust bag, crust shield, and oven spatter guard along with espresso powder and a nifty bread slasher.


MBH's Christmas surprise didn't end there because he also got me a subscription to Cook's Illustrated, the magazine I have been dying to receive for many years.


Between MBH and my parents, I added five cookbooks to my collection. MBH gave me the Joy of Cooking: 75th Anniversary Edition - 2006, Williams Sonoma Paris: Authentic Recipes Celebrating the Foods of the World (Williams-Sonoma Foods of the World), and staying with the Cook's Illustrated Theme, The Yellow Farmhouse Cookbook by Christopher Kimball; the bow-tie wearing editor of Cook's Illustrated. My folks decided to keep with my request for a taste of Northern Michigan home cooking this Christmas by getting me Hollyhocks and Radishes: Mrs Chard's Almanac Cookbook, a lovely cookbook filled with stories and recipes from a family farm stand and the fabulous Ships of the Great Lakes Cookbook which combines my love of food with my love of the big ore boats of the Great Lakes!


Finally, when I got home Sunday from my folks house in Northern Michigan, one last Christmas present from MBH had arrived: The French Chef With Julia Child 2 DVD's to complete my Julia Child collection.

I'm sure somewhere in all this booty I will find success with pie...