

Our first recipe to tackle? Maggie Glazer's Royal Crown's Tortano
This rustic bread is one of the signature breads at Royal Crown Bakery in Brooklyn and is shaped in the round. This bread also starts out as a really wet dough, around 73% when all is said and done. It takes almost two full days to make the bread, so you have to start the night before with a pre-ferment. After letting the pre-ferment get all bubbly and sour, you combine the ingredients and have what amounts to dough soup.
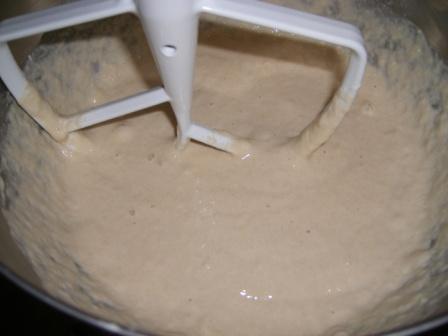
If you have patience though (and remember to put all the flour in, which I almost didn't do!), after about 15 minutes you have a nice but very soft dough ball.
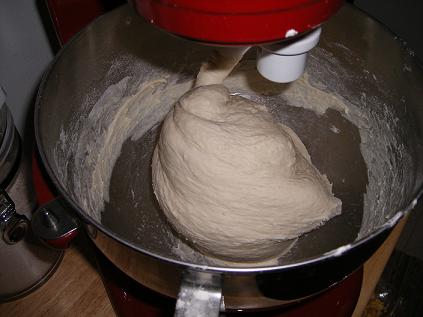
During the first rise, you have to turn the dough four times ala puff pastry. It is during this "turning" that the dough begins to come together. Also, you are strengthening the gluten so that during the rise after the forming of the loaf, the dough can support itself. After the first rise ends, you shape the loaf into the round shape and let it rise again.

One interesting thing about this bread is it is a slow riser but has incredible oven spring. I've never had a loaf spring like this one. In fact, I was pretty sure when it went into the oven that I would have a tasty but really flat bread. But after 20 minutes in the oven when I took a peak, the bread had tripled in size! By the time I pulled the really brown and crusty loaf out of the oven, the hole in the middle had all but closed up, leaving me with a little belly button instead of a doughnut.
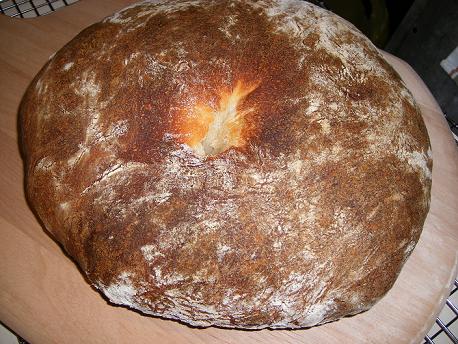
That's OK, because this loaf was one of the most flavourful loaves with big huge holes that I've ever made

and judging by the response at the office, despite taking two days to make, this is one loaf that I'm making over and over.
If you want to see how A Fridge Full of Food (Glenna), Bake My Day (Karen), Cookie Baker Lynn (Lynn), I Like to Cook (Sara), Living on Bread and Water (Monique), Lucullian Delights (Ilva), My Kitchen in Half Cups (Tanna), Nami-Nami (Pille), Notitie van Lien (Lien), and What Did You Eat (Sher) did on their Royal Crown Tortano, you should click on over to see them. Especially check out our host kitchen, Karen of Bake My Day.
Would you like to be Bread Baking Buddy? Think you have what it takes to conquer this wet dough?? Want to earn a merit badge for you blog???
For those of you who want to give this bread a whirl and earn a merit badge for your blog, you can bake the bread sometime in the next week, blog about it and email Karen or leave her a comment with a link to your post. If you don't have a blog, still tell us about it! Karen will be putting a list of everyone who joined us this month for the Royal Crown Tortano and we'll send out a cute little badge. Remember, you only have one week to bake your bread so start those pre-ferments!!
Royal Crown's Tortano
(from Artisan Baking Across America by Maggie Glazer)
Recipe Quantity: One (1) 2 1/4lb (1200 gram) tortano
Time Required for Recipe: About 19 hours, with about 20 minutes of active work
Note about recipe: You will need to start this recipe the night BEFORE you want to bake the bread.
This is the most beautiful bread Royal Crown makes, a huge round loaf filled with radish size air cells, tanks to careful handling and lots of water in teh dough. Joe adds potato for flavor and moistness and honey for color to this very wet, squichy dough. For extra flavor, the bread is leavened solely by its starter, so it rises very slowly and develops a nice but not aggressive acidity. To get authentic Italian flavor, you will need to bake this bread to a deep, dark brown so don't skimp on the baking time - the bread will not burn.
Recipe Synopsis
The Evening Before Baking: Make the starter and if you like the mashed potato.
The Next Morning: Mix the dough and let it ferment for about 4 hours. Shape it, proof it for about 1 1/2 hours, and then bake the bread for about 45 minutes.
The Evening Before Baking: Making the Pre-Ferment:
Ingredients Volume (English units)
1/4 tsp instant yeast
1 cup water 105 - 115 degrees F
2/3 cup unbleached bread flour
1 small potato
Ingredients Weight
1/4 tsp instant yeast
1 cup water 105 - 115 degrees F
3.5 ounces unbleached bread flour
3 ounce small potato
Ingredients Metric
1/4 tsp instant yeast
1 cup water 105 - 115 degrees F
100 grams unbleached bread flour
85 grams small potato
Ingredients Baker's Percentages
eventually 0.3% instant yeast
eventually 73% water 105 - 115 degrees F
100% unbleached bread flour
1 small potato
Stir the yeast into the water in a glass measure and let it stand for 5 - 10 minutes. Add 1/3 cup of this yeasted water (discard the rest) to the flour and beat this very sticky starter until it is well combined. Cover with plastic wrap and let it ferment until it is full of huge bubbles and sharp tasting, about 12 hours. If your kitchen is very warm and the pre-ferment is fermenting very quickly, place it in the refrigerator after 3 hours of fermenting. In the morning, remove it and allow it to come to room temperature 30 minutes to an hour before beginning the final dough
Preparing the Potato: For efficiency, you may want to prepare the potato the night before. Quarter it, then boil it in water to cover until it can be easily pierced with a knife tip, about 20 minutes. Drain; if desired, reserve the water for the dough. Press the potato through a ricer or sieve to puree it and remove the skin. Store it in a covered container in the refrigerator. You will need only 1/4 cup puree.
Bake Day: Mixing the Dough
Ingredients Volume (English units)
3 3/4 cups unbleached bread flour
1 3/4 cups plus 3 Tbsp Water, including the potato water if desired, lukewarm
Pre-ferment
2 tsp honey
1/4 cup packed Potato puree
1 Tbsp salt
Ingredients Weight
20 ounces unbleached bread flour
14.6 ounces Water, including the potato water if desired, lukewarm
Pre-ferment
0.4 ounces honey
2 ounces Potato puree
0.5 ounces salt
Ingredients Metric
575 grams unbleached bread flour
420 grams Water, including the potato water if desired, lukewarm
Pre-ferment
14 grams honey
60 grams Potato puree
15 grams salt
Ingredients Baker's Percentages
100% unbleached bread flour
73% Water, including the potato water if desired, lukewarm
30% Pre-ferment
2% honey
10% Potato puree
2.4% salt
By Hand: Use your hands to mnix the flour and water into a rough, very wet dough in a large bowl. Cover the dough and let rest (autolyse) for 10 - 20 minutes.
Add the pre-ferment, honey, potato, and salt, and knead the dough until it is smooth, 5 - 10 minutes. It will start off feeling rubbery, then break down into goo; if you persist, eventually it will come together into a smooth, shiny dough. If you do not have the skill or time to knead it to smoothness, the bread will not suffer. This is a tremendously wet and sticky dough, so use a dough scraper to help you but do not add more flour, for it will ruin the texture of the bread.
By Stand Mixer: With your hands or a wooden spoon, mix the flour and water into a rough, very wet dough in the work bowl of your mixer. Cover the dough and let it rest (autolyse) for 10 - 20 minutes.
Fit the mixer with the dough hook. Add the pre-ferment, honey, potato and salt and the mix the dough on medium speed for 15 - 20 minutes, or until very silky and wraps around the hook and cleans the bowl before splaterring back around the bowl. This dough is almost pourably wet.
Fermenting and Turning the Dough:
Shape the dough into a ball and roll it in flour. Place it in a container at least 3 times its size and cover tightly with plastic wrap. Let it ferment until doubled in bulk and filled with large air bubbles, about 4 hours. Using plenty of dusting flour, turn the dough 4 times in 20 minute intervals, that is, after 20, 40, 60, and 80 minutes of fermenting, the leave the dough undisturbed for the remaining time. Do not allow this dough to over ferment or forment to the point of collapse, for the flavor and structure of your bread will suffer.
Shaping and Proofing the Dough:
Turn the fermented dough out onto a well floured work surface, round it and let it rest for 20 minutes. Sprinkle a couche or wooden board generously with flour. Slip a baking sheet under the couche if you are using one for support.
Sprinkle a generous amount of flour over the center of the ball. Push your fingers into the center to make a hole, the rotate your hand around the hole to widen it, making a large 4 inch opening. The bread should have about 12 inch diameter.
Place the dough smooth side down on the floured couche or board and dust the surface with more flour. Drape it with plastic wrap and let it proof until it is light and slowly springs back when lightly pressed, about 1 1/2 hours.
Preheating the Oven:
Immediately after shaping the bread, arrange a rack on the oven's second to top shelf and place a baking stone on it. Clear away all the racks above the one being used. Preheat the oven to 450 degrees (230 C)
Baking the Bread:
Unwrap the bread and flip it onto a floured peel or a sheet of parchment paper. Do not worry about damaging the bread as you handle it; it will recover int eh oven as long as it is not overproofed. Slash it with 4 radial cuts in the shape of a cross. Slide the loaf onto the hot baking stone and bake until it is very dark brown, 40 -50 minutes, rotating it halfway into the bake. Let the bread cool on a rack.


